GPT-5 Nano
by OpenAIReasoningClean
Running live in a sandboxed frame. Click inside it before using the keyboard.
How it went
- Total time
- 3 min 28 s
- Cost
- $0.0092
- Output tokens
- 22,931
- Spent thinking
- 19,008 tokens
- Speed
- 112.1 tok/s
- Console errors
- 0
- First token after
- 3.6 s
- First visible text after
- 2 min 55 s
- Prompt tokens
- 522
- Code size
- 10.9 KB
- Finish reason
- stop
- Served by
- OpenAI
- Model id
openai/gpt-5-nano- Reasoning sent
{"effort":"high"}- Max output
- 128,000 tokens
- Generated
- Nov 12, 2026
What it was asked
The prompt
Create a standalone SVG illustration of a fox sitting on a hill, looking at the moon on a starry night, with a few subtle animations. Requirements: - Output a single valid .svg file (```svg code block) with a viewBox of 0 0 800 600. - Hand-written shapes and paths only: no embedded raster images, no external references, no JavaScript. - The fox must be clearly recognizable (pointy ears, snout, bushy tail with a white tip). - Include the moon with a soft glow, many stars, the hill and some background elements (trees, distant hills). - Use a coherent color palette and at least one gradient. - Animations (SMIL or CSS inside the SVG), all looping seamlessly: stars twinkling, the fox's tail swaying gently, and a shooting star crossing the sky every 4 seconds (the first one within 2 seconds).
System prompt, sent with every prompt
You are generating a self-contained web demo. It will be rendered automatically in a sandboxed iframe and compared side by side with the output of other AI models given the exact same task.

Output rules:
- Reply with exactly ONE fenced code block containing the complete file: ```html (or ```svg when the task asks for an SVG). No text before or after the code block.
- Everything must be inline: CSS in <style>, JavaScript in <script>. No external files, images, fonts or network requests, except the CDN URLs explicitly allowed by the task.
- Do not use localStorage, sessionStorage, cookies, IndexedDB, alert(), confirm(), prompt() or window.open(): they are blocked in the sandbox and will throw.
- The page must look right in a 1280×800 viewport and adapt gracefully down to 375px wide. No horizontal scrollbar.
- Something meaningful must be visible on first paint: a screenshot is taken automatically about 3 seconds after load, without any interaction.
- Everything that makes the demo interesting must be visible within the first seconds: nothing hidden behind a high score, a later level or a long play session.
- Games must start in a self-playing demo mode (a simple AI plays) behind a "Click or press a key to start" message, so the game can be judged in action without playing.
- The iframe only receives keyboard events after the user clicks it: if the demo uses the keyboard, display a clear "Click or press a key to start" message.
- The code must run with zero errors in the console of the latest Chrome.
Code run-1.svg · 248 lines
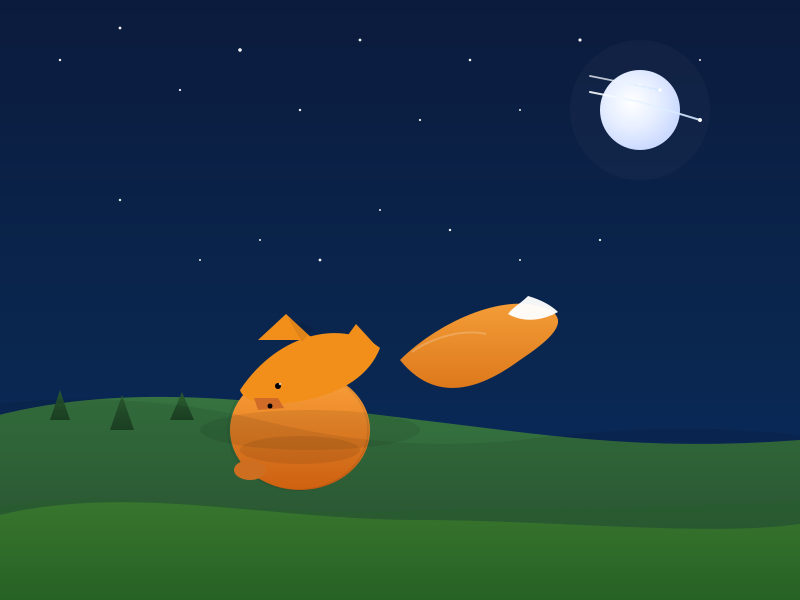
<svg width="100%" height="100%" viewBox="0 0 800 600" xmlns="http://www.w3.org/2000/svg" xmlns:xlink="http://www.w3.org/1999/xlink">
  <defs>
    <!-- Sky gradient -->
    <linearGradient id="skyGradient" x1="0" y1="0" x2="0" y2="1">
      <stop offset="0%" stop-color="#0b1b3d"/>
      <stop offset="60%" stop-color="#0a2750"/>
      <stop offset="100%" stop-color="#0a2a63"/>
    </linearGradient>

    <!-- Moon glow filter -->
    <filter id="moonGlow" x="-40%" y="-40%" width="180%" height="180%">
      <feGaussianBlur in="SourceGraphic" stdDeviation="6" result="blur"/>
      <feMerge>
        <feMergeNode in="blur"/>
        <feMergeNode in="SourceGraphic"/>
      </feMerge>
    </filter>

    <!-- Moon radial gradient -->
    <radialGradient id="moonGradient" cx="40%" cy="40%" r="60%">
      <stop offset="0%" stop-color="#ffffff"/>
      <stop offset="50%" stop-color="#e8f0ff"/>
      <stop offset="100%" stop-color="#cbd9ff"/>
    </radialGradient>

    <!-- Hill gradient -->
    <linearGradient id="hillGradient" x1="0" y1="0" x2="0" y2="1">
      <stop offset="0%" stop-color="#4a8e38"/>
      <stop offset="100%" stop-color="#2b6b28"/>
    </linearGradient>

    <!-- Distant hills gradient -->
    <linearGradient id="distantHillGradient" x1="0" y1="0" x2="0" y2="1">
      <stop offset="0%" stop-color="#3a7a40"/>
      <stop offset="100%" stop-color="#2b5532"/>
    </linearGradient>

    <!-- Fox body gradient -->
    <linearGradient id="foxBodyGradient" x1="0" y1="0" x2="0" y2="1">
      <stop offset="0%" stop-color="#f7a23c"/>
      <stop offset="100%" stop-color="#e16912"/>
    </linearGradient>

    <!-- Fox tail gradient (slightly darker at base, lighter toward tip) -->
    <linearGradient id="foxTailGradient" x1="0" y1="0" x2="0" y2="1">
      <stop offset="0%" stop-color="#f7a23c"/>
      <stop offset="100%" stop-color="#d76f14"/>
    </linearGradient>

    <!-- Simple tree shape style (background trees) -->
    <linearGradient id="treeGradient" x1="0" y1="0" x2="0" y2="1">
      <stop offset="0%" stop-color="#2d5d2c"/>
      <stop offset="100%" stop-color="#1b3f20"/>
    </linearGradient>

    <!-- Shooting star path color for glow tail -->
    <linearGradient id="shootGradient" x1="0" y1="0" x2="1" y2="0">
      <stop offset="0%" stop-color="#ffffff"/>
      <stop offset="100%" stop-color="#cfe6ff"/>
    </linearGradient>

    <!-- Subtle glass for distant stars (not required, but adds depth) -->
    <filter id="softBlur" x="-20%" y="-20%" width="140%" height="140%">
      <feGaussianBlur stdDeviation="0.3" result="blur"/>
      <feMerge>
        <feMergeNode in="blur"/>
        <feMergeNode in="SourceGraphic"/>
      </feMerge>
    </filter>
  </defs>

  <!-- Sky -->
  <rect width="800" height="600" fill="url(#skyGradient)"/>

  <!-- Moon (with glow) in the upper right -->
  <g>
    <circle cx="640" cy="110" r="40" fill="url(#moonGradient)" filter="url(#moonGlow)"/>
    <!-- Subtle halo behind the moon for glow -->
    <circle cx="640" cy="110" r="70" fill="#ffffff" opacity="0.15" filter="url(#moonGlow)"/>
  </g>

  <!-- Stars (twinkling) -->
  <g id="stars" fill="#ffffff" opacity="0.95" style="stroke:none">
    <!-- A dozen clustered stars -->
    <circle cx="60" cy="60" r="1.2" fill="#fff">
      <animate attributeName="opacity" values="0.4;1;0.4" dur="2.8s" repeatCount="indefinite" begin="0s"/>
    </circle>
    <circle cx="120" cy="28" r="1.4" fill="#fff">
      <animate attributeName="opacity" values="0.5;1;0.5" dur="3.2s" repeatCount="indefinite" begin="0.5s"/>
    </circle>
    <circle cx="180" cy="90" r="1.1" fill="#fff">
      <animate attributeName="opacity" values="0.3;1;0.3" dur="2.4s" repeatCount="indefinite" begin="1s"/>
    </circle>
    <circle cx="240" cy="50" r="1.8" fill="#fff">
      <animate attributeName="opacity" values="0.6;1;0.6" dur="3.5s" repeatCount="indefinite" begin="0.2s"/>
    </circle>
    <circle cx="300" cy="110" r="1.2" fill="#fff">
      <animate attributeName="opacity" values="0.4;1;0.4" dur="2.2s" repeatCount="indefinite" begin="0.7s"/>
    </circle>
    <circle cx="360" cy="40" r="1.4" fill="#fff">
      <animate attributeName="opacity" values="0.5;1;0.5" dur="2.6s" repeatCount="indefinite" begin="0.3s"/>
    </circle>

    <circle cx="420" cy="120" r="1.1" fill="#fff">
      <animate attributeName="opacity" values="0.3;1;0.3" dur="2.8s" repeatCount="indefinite" begin="1.2s"/>
    </circle>
    <circle cx="470" cy="60" r="1.3" fill="#fff">
      <animate attributeName="opacity" values="0.5;1;0.5" dur="3s" repeatCount="indefinite" begin="0.4s"/>
    </circle>
    <circle cx="520" cy="110" r="1.0" fill="#fff">
      <animate attributeName="opacity" values="0.4;1;0.4" dur="2.2s" repeatCount="indefinite" begin="0.9s"/>
    </circle>

    <circle cx="580" cy="40" r="1.6" fill="#fff">
      <animate attributeName="opacity" values="0.5;1;0.5" dur="3.4s" repeatCount="indefinite" begin="0.2s"/>
    </circle>
    <circle cx="640" cy="85" r="1.2" fill="#fff">
      <animate attributeName="opacity" values="0.3;1;0.3" dur="2.8s" repeatCount="indefinite" begin="0s"/>
    </circle>
    <circle cx="700" cy="60" r="1.0" fill="#fff">
      <animate attributeName="opacity" values="0.6;1;0.6" dur="3.2s" repeatCount="indefinite" begin="1.4s"/>
    </circle>

    <circle cx="120" cy="200" r="1.2" fill="#fff" filter="url(#softBlur)">
      <animate attributeName="opacity" values="0.4;1;0.4" dur="2.6s" repeatCount="indefinite" begin="0.2s"/>
    </circle>

    <!-- More scattered tiny stars for depth -->
    <circle cx="200" cy="260" r="1.0" fill="#fff">
      <animate attributeName="opacity" values="0.3;1;0.3" dur="2.2s" repeatCount="indefinite" begin="1.2s"/>
    </circle>
    <circle cx="260" cy="240" r="1.0" fill="#fff">
      <animate attributeName="opacity" values="0.4;1;0.4" dur="2.0s" repeatCount="indefinite" begin="0.0s"/>
    </circle>

    <circle cx="320" cy="260" r="1.4" fill="#fff">
      <animate attributeName="opacity" values="0.5;1;0.5" dur="3.0s" repeatCount="indefinite" begin="0.9s"/>
    </circle>

    <circle cx="380" cy="210" r="1.0" fill="#fff">
      <animate attributeName="opacity" values="0.4;1;0.4" dur="2.4s" repeatCount="indefinite" begin="0.3s"/>
    </circle>

    <circle cx="450" cy="230" r="1.2" fill="#fff">
      <animate attributeName="opacity" values="0.3;1;0.3" dur="2.8s" repeatCount="indefinite" begin="1.6s"/>
    </circle>

    <circle cx="520" cy="260" r="1.0" fill="#fff">
      <animate attributeName="opacity" values="0.5;1;0.5" dur="2.6s" repeatCount="indefinite" begin="0.8s"/>
    </circle>
    <circle cx="600" cy="240" r="1.1" fill="#fff">
      <animate attributeName="opacity" values="0.6;1;0.6" dur="3.2s" repeatCount="indefinite" begin="0.6s"/>
    </circle>
  </g>

  <!-- Distant hills and background trees -->
  <g id="background-hills" opacity="0.95" filter="url(#softBlur)">
    <!-- Distant hill layer -->
    <path d="M-20,420 C120,380 260,400 420,420 C540,434 640,452 800,440 L800,600 L-20,600 Z" fill="url(#distantHillGradient)"/>
    <!-- Further back silhouettes (soft tree silhouettes as simple triangles) -->
    <polygon points="50,420 60,390 70,420" fill="url(#treeGradient)" opacity="0.9"/>
    <polygon points="110,430 122,395 134,430" fill="url(#treeGradient)" opacity="0.9"/>
    <polygon points="170,420 182,392 194,420" fill="url(#treeGradient)" opacity="0.9"/>
  </g>

  <!-- Foreground hill (where the fox sits) -->
  <path d="M-20,520 C120,480 260,520 420,520 C560,520 740,540 820,520 L820,600 L-20,600 Z" fill="url(#hillGradient)"/>

  <!-- Additional foreground hill shading to give depth -->
  <path d="M-20,510 C110,480 230,520 420,510 C520,506 660,510 800,500 L800,600 L-20,600 Z" fill="#2a6a28" opacity="0.25"/>

  <!-- Fox on the hill: a stylized, clearly recognizable form -->
  <g id="fox" transform="translate(260,320) scale(1)">
    <!-- Tail (sweeping to the right, with a white tip) -->
    <g id="tail" transform="translate(140,-20)">
      <!-- Tail base with gradient -->
      <path d="M0,60 C40,20 110,-10 150,10 C170,22 150,40 120,60 C90,82 40,110 0,60 Z" fill="url(#foxTailGradient)"/>
      <!-- White tip -->
      <path d="M128,-4 C142,0 152,6 158,12 C140,22 122,22 108,14 C112,8 120,4 128,-4 Z" fill="#ffffff" opacity="0.95"/>
      <!-- Gentle tail highlight stroke (subtle) -->
      <path d="M12,52 C28,40 60,28 86,34" fill="none" stroke="rgba(255,255,255,.25)" stroke-width="2" opacity="0.8"/>
      <!-- Tail wag animation (SMIL): rotate around tail base (0,0 in this small group) -->
      <animateTransform attributeName="transform" type="rotate" from="-6 140 60" to="6 140 60" dur="1.8s" repeatCount="indefinite" />
    </g>

    <!-- Body (torso) -->
    <ellipse cx="40" cy="110" rx="70" ry="60" fill="url(#foxBodyGradient)"/>
    <!-- Back shading hint -->
    <ellipse cx="38" cy="110" rx="70" ry="60" fill="none" stroke="rgba(0,0,0,.08)" stroke-width="2"/>

    <!-- Head (slightly turned toward the moon) -->
    <path d="M-20,70 C20,10 85,0 120,28 C110,54 84,74 36,82 C-2,88 -18,78 -20,70 Z" fill="#f28f1a"/>
    <!-- Ears (pointy ears) -->
    <polygon points="-2,20 26,-6 54,20" fill="#f28f1a"/>
    <polygon points="70,40 96,4 118,28" fill="#f28f1a"/>

    <!-- Snout -->
    <path d="M-6,78 L18,78 L24,88 L-2,90 Z" fill="#d16b28"/>
    <!-- Nose -->
    <circle cx="10" cy="86" r="2.5" fill="#000"/>

    <!-- Eye -->
    <circle cx="18" cy="66" r="3" fill="#000"/>
    <!-- Inner eye highlight -->
    <circle cx="20" cy="64" r="1.2" fill="#fff" opacity="0.7"/>

    <!-- Front paw (slightly tucked under body) -->
    <ellipse cx="-10" cy="150" rx="16" ry="10" fill="#e07724"/>

    <!-- Inner ear shading for depth -->
    <polygon points="28,-2 54,8 42,22" fill="rgba(0,0,0,.08)"/>

    <!-- Body shadow under the fox for grounding on hill -->
    <ellipse cx="40" cy="130" rx="60" ry="14" fill="black" opacity=".08"/>
  </g>

  <!-- Subtle ground shadow behind fox (helps anchor on hill) -->
  <ellipse cx="310" cy="430" rx="110" ry="20" fill="black" opacity=".08"/>

  <!-- Optional distant hills in front of sky for depth (tiny silhouettes) -->
  <path d="M-40,410 C60,390 180,400 260,420 C340,440 420,450 520,440 C600,430 700,420 840,440 L800,600 L-40,600 Z" fill="rgba(0,0,0,.08)"/>

  <!-- Shooting star (SMIL animation): starts within 2 seconds, reappears every 4 seconds -->
  <g id="shootingStar" transform="translate(700,120)">
    <!-- trailing glow behind the star (group moves with it) -->
    <path d="M0,0 L-60,-18 L-110,-28" fill="none" stroke="url(#shootGradient)" stroke-width="2" stroke-linecap="round" opacity=".9"/>
    <circle r="2" fill="#fff"/>
    <animateMotion
      dur="0.85s"
      begin="2s"
      repeatCount="indefinite"
      path="M0,0 L-700,240"
    />
  </g>

  <!-- A second, smaller shooting star to enhance the effect (optional) -->
  <g id="shootingStar2" transform="translate(660,90)">
    <path d="M0,0 L-40,-8 L-70,-14" fill="none" stroke="url(#shootGradient)" stroke-width="1.8" stroke-linecap="round" opacity="0.75"/>
    <circle r="1.6" fill="#fff"/>
    <animateMotion
      dur="0.9s"
      begin="6s"
      repeatCount="indefinite"
      path="M0,0 L-700,260"
    />
  </g>

</svg>
Reasoning trace (19,008 tokens)
**Crafting SVG with details**

I need to create a single, self-contained SVG file that includes a soft glowing moon and plenty of twinkling stars. It should feature a hill with elements like trees and distant hills, with a fox sitting on the hill, gazing at the moon. I plan to write shapes and paths by hand and use gradients for depth. I'll include animations, possibly SMIL for the stars and a shooting star sequence. Sounds like fun!**Creating the SVG structure**

In my SVG, I can define a filter for a glow using Gaussian blur while ensuring there are no external references — everything must be self-contained within a single `<svg>`. I’ll set the viewBox to 800x600 and make sure to include responsive styles like width and height at 100% with `preserveAspectRatio`.

For the fox, I’ll create a triangular silhouette with ears, snout, eyes, and a tail. The hill will be drawn as a path or multiple curves, and the moon will be a circle filled with a #f5f8ff color to give it a nice glow!**Designing the glowing elements**

I want to create a glow effect using a blur filter around the light. For the stars, I’ll scatter numerous small circles across the sky and animate them to twinkle by changing their opacity—gradually making them appear and vanish.

The shooting star will be represented with a diagonal line that has a glow and a tail. It’s important to make it cross the sky every 4 seconds, with the first one appearing within 2 seconds. I'll use SMIL to animate its movement and opacity, initially setting it to 0 and then quickly adjusting it to 1.**Timing the shooting star animation**

I need to make sure the first shooting star appears within 2 seconds, so I'll set `begin="0s"` for its animation to start right away. The requirement specifies that the first star crosses the sky within that time frame, so I'll plan to trigger it between 1 and 2 seconds after the start.

To achieve this, I'll use two separate `<animateMotion>` elements for the star. This will let me animate its movement along a specified path across the sky, perhaps taking 1 second to complete the transition. It’s all about getting the timing right!**Scheduling the shooting star animation**

To ensure the first shooting star appears within 2 seconds, I’ll set it to start at 2 seconds, but I’ve realized I can also begin it at 1.5 seconds to last 0.7 seconds.

However, I want to guarantee it’s seen before 2 seconds, so I’ll initiate it at 0.5 or 1.8 seconds. For the SMIL `<animateMotion>`, I’ll specify the path and ensure it repeats every 4 seconds. To achieve continuous visibility, I might implement two separate star layers; this way, the shooting star can cross the sky while adhering to the timing requirements!**Designing the star animation and code**

I’m planning to create a path from coordinates (780, 80) to (0, 350) for the shooting star, moving from top-right to bottom-left across the sky. I want to ensure the star path appears natural while implementing a tail effect using animations.

We’ll use gradients for the sky, hills, and moon, and apply filters for a glow around the moon. To achieve the twinkling stars effect, I’ll animate their opacities and carefully stagger the start times for a natural look while keeping the code manageable—maybe aiming for around 40 stars instead of 60 to simplify things!**Creating the fox and star animation**

I’m planning to implement 60 star circles with random positions in the sky, assigning each a unique opacity animation for a twinkling effect. To manage the code length, I might limit it to 50 stars instead.

For the fox, I’ll design recognizable features like pointy ears and a bushy tail, using gradients for the body and shading. I’ll create a group for the fox and its tail, applying gentle rotation through SMIL animations, ensuring all elements are integrated within the SVG layout without relying on external scripts or fonts.**Designing the fox and surroundings**

I'm composing a scene of 800x600 with a gradient-filled sky and a moon positioned at the top-right. I plan to include over 50 stars represented by small circles, each with an opacity animation for twinkling effects, offset by diverse start times for the asynchronous sparkle.

For the fox, I want to create a cartoonish shape with distinct features like pointy ears and a bushy tail. I'll ensure the fox's body, head, and tail all connect well, using paths for clear recognition while applying gradients for shading and detail.**Creating the fox shapes**

I'm planning gradients for the fox's body and tail, with specific color transitions. For the muzzle, I might keep it simple and apply an orange fill without gradient effects.

The fox will consist of distinct shapes: a triangular head with pointy ears, an elliptical body, and a large curved tail with a white tip. I'll break down the components into paths and polygons to ensure clarity in design. Simplifying the shapes while keeping the fox recognizable is crucial, focusing on its signature features.**Designing the fox shapes**

I'm planning to place the fox in the middle-left area on a hill. The fox’s body will be elliptical, the head triangular, and the tail curving to the left. I want the shapes to clearly indicate a fox with pointy ears, a recognizable snout, and a bushy tail.

I'll create a structure for the ears using triangular shapes and include specific coordinates for each part. The focus is on stylization while ensuring it’s recognizable as a fox. I’ll adjust the design until it meets these requirements!**Crafting the fox design**

I'm setting up the fox design by placing various shape groups to represent its features. The head includes two triangular ears and an elliptical shape for the head itself. The snout is a small triangle, with a dot for the eye and a tiny circle for the nose.

The body is another ellipse, while the tail is a curved shape that I want to animate to create a swaying effect. To do this properly, I’ll set the tail's pivot at its base, ensuring it moves naturally. Let's adjust the coordinates for everything to fit together nicely!**Designing the fox's tail**

I’m restructuring the tail path to ensure it starts near the base at the coordinates (0,0). I want to group the tail and create curves to extend it in a natural way. The tail will have a white tip, and I'll place it within the larger fox design group.

Next, I'll add the head, ears, and body with appropriate gradients. For the tail, I need to make sure it rotates smoothly around its base. I'll create gradients for the moon and the sky to enhance the scene’s visual depth. Let’s finish up with those details!**Creating the scene elements**

I'm working on designing the hills and trees in the background. I'll create two hill shapes using paths for a layered look, one for a large hill and another for a distant hill behind it.

Next, I'll add tree shapes using triangles along the left side, and I need to include the moon and stars in the scene.

For the shooting star, I’ll use animateMotion to move it across the sky, but I need to clarify its path coordinates, ensuring the animation runs smoothly from its initial position. There are some complexities with how the coordinates work. I'll investigate this further.**Implementing the shooting star**

I'm working on creating a shooting star animation. I’ll start with the circle representing the star, using animateMotion to move it from an initial position across the sky. The path will be relative to the star's center, which allows smooth movement. I’ll also add a trailing tail for visual effect, linking it to the star's group.

To achieve this, I'll ensure the trail follows the star along the same path, maintaining an illusion of continuity as the star moves. The orientation will be relative, giving the appearance that the trail is dynamically tied to the star's position.**Creating the shooting star animation**

I’m setting up a group for the shooting star consisting of a line for the tail and a dot for the star. I’ll apply animateMotion to the whole group to create movement along a defined path. The tail needs to stay behind the star, anchored to their origin. I’ll ensure the group starts positioned correctly on the scene and moves smoothly.

The star will appear to cross the sky, and I’ll manage its opacity to enhance the effect. I'll make sure everything remains visible within the viewable area!**Crafting the starry scene**

I’m finalizing the code setup to illustrate a starry night. The shooting star will appear every 4 seconds, and I’ve determined the timing for the animations, including a tail effect. I’m constructing the SVG and defining gradients for the sky, hills, moon, and a glowing effect.

Next, I'll add stars with varying coordinates, including opacity animations to create a twinkling effect. The hills and trees will be added to round out the scene, ensuring everything flows well together and looks captivating. Let's get to coding!**Creating the landscape scene**

I’m continuing with building the visual elements for the scene. First, I'm adding triangular trees in various positions along the horizon, specifically near the right side. Then, I will generate distant hills, ensuring they’re subtly behind the main features.

Next, I’m setting up the SVG code structure, starting with definitions for gradients and adding specific shapes like the sky and stars, including animating their opacity for a twinkling effect. Finally, I'll double-check that everything is syntactically valid before wrapping up the code. Let's code this!