Nemotron 3 Nano Omni (free)
by NVIDIAReasoningClean
Running live in a sandboxed frame. Click inside it before using the keyboard.
How it went
- Total time
- 1 min 42 s
- Cost
- $0
- Output tokens
- 13,369
- Spent thinking
- 11,355 tokens
- Speed
- 131.4 tok/s
- Console errors
- 0
- First token after
- 210 ms
- First visible text after
- 1 min 24 s
- Prompt tokens
- 548
- Code size
- 4.3 KB
- Finish reason
- stop
- Served by
- Nvidia
- Model id
nvidia/nemotron-3-nano-omni-30b-a3b-reasoning:free- Reasoning sent
model default- Max output
- 32,000 tokens
- Generated
- Nov 9, 2026
What it was asked
The prompt
Create a standalone SVG illustration of a fox sitting on a hill, looking at the moon on a starry night, with a few subtle animations. Requirements: - Output a single valid .svg file (```svg code block) with a viewBox of 0 0 800 600. - Hand-written shapes and paths only: no embedded raster images, no external references, no JavaScript. - The fox must be clearly recognizable (pointy ears, snout, bushy tail with a white tip). - Include the moon with a soft glow, many stars, the hill and some background elements (trees, distant hills). - Use a coherent color palette and at least one gradient. - Animations (SMIL or CSS inside the SVG), all looping seamlessly: stars twinkling, the fox's tail swaying gently, and a shooting star crossing the sky every 4 seconds (the first one within 2 seconds).
System prompt, sent with every prompt
You are generating a self-contained web demo. It will be rendered automatically in a sandboxed iframe and compared side by side with the output of other AI models given the exact same task.

Output rules:
- Reply with exactly ONE fenced code block containing the complete file: ```html (or ```svg when the task asks for an SVG). No text before or after the code block.
- Everything must be inline: CSS in <style>, JavaScript in <script>. No external files, images, fonts or network requests, except the CDN URLs explicitly allowed by the task.
- Do not use localStorage, sessionStorage, cookies, IndexedDB, alert(), confirm(), prompt() or window.open(): they are blocked in the sandbox and will throw.
- The page must look right in a 1280×800 viewport and adapt gracefully down to 375px wide. No horizontal scrollbar.
- Something meaningful must be visible on first paint: a screenshot is taken automatically about 3 seconds after load, without any interaction.
- Everything that makes the demo interesting must be visible within the first seconds: nothing hidden behind a high score, a later level or a long play session.
- Games must start in a self-playing demo mode (a simple AI plays) behind a "Click or press a key to start" message, so the game can be judged in action without playing.
- The iframe only receives keyboard events after the user clicks it: if the demo uses the keyboard, display a clear "Click or press a key to start" message.
- The code must run with zero errors in the console of the latest Chrome.
Code run-1.svg · 74 lines
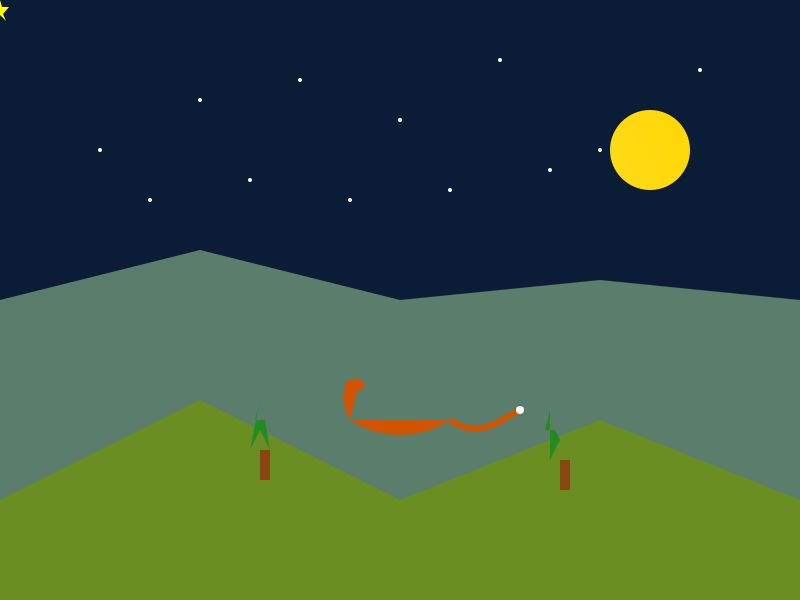
<svg xmlns="http://www.w3.org/2000/svg" viewBox="0 0 800 600" width="800" height="600">
  <defs>
    <radialGradient id="moonGlow" cx="50%" cy="50%" r="50%" gradientUnits="userSpaceOnUse">
      <stop offset="0%" stop-color="white" stop-opacity="0.8"/>
      <stop offset="100%" stop-color="white" stop-opacity="0"/>
    </radialGradient>
  </defs>
  <rect width="800" height="600" fill="#0b1d36"/>
  <polygon points="0,300 200,250 400,300 600,280 800,300 800,600 0,600" fill="#8fbc8f" opacity="0.6"/>
  <polygon points="0,500 200,400 400,500 600,420 800,500 800,600 0,600" fill="#6b8e23"/>
  <polygon points="250,450 260,430 270,450 265,420 255,420 260,400" fill="#228b22"/>
  <rect x="260" y="450" width="10" height="30" fill="#8b4513"/>
  <polygon points="550,460 560,440 570,460 555,430 545,430 550,410" fill="#228b22"/>
  <rect x="560" y="460" width="10" height="30" fill="#8b4513"/>
  <g id="fox">
    <path d="M 350,420 C 380,440 420,440 450,420 Z" fill="#d35400"/>
    <path d="M 350,420 C 340,400 340,380 360,380 Z" fill="#d35400"/>
    <path d="M 345,380 L 335,360 L 340,370 Z" fill="#d35400"/>
    <path d="M 355,380 L 365,360 L 360,370 Z" fill="#d35400"/>
    <ellipse cx="355" cy="385" rx="10" ry="6" fill="#d35400"/>
    <path d="M 380,440 L 380,460" fill="#d35400"/>
    <path d="M 430,440 L 430,460" fill="#d35400"/>
    <g id="tailGroup" transform="translate(450,420)">
      <path d="M 0,0 C 30,20 50,0 70,-10" stroke="#d35400" stroke-width="6" fill="none"/>
      <circle cx="70" cy="-10" r="4" fill="white"/>
    </g>
    <animateTransform attributeName="transform" type="rotate" from="-10" to="10" dur="6s" repeatCount="indefinite" additive="sum"/>
  </g>
  <circle class="star" cx="200" cy="100" r="2" fill="white">
    <animate attributeName="opacity" values="0.2;1;0.2" dur="2s" begin="0s" repeatCount="indefinite"/>
  </circle>
  <circle class="star" cx="300" cy="80" r="2" fill="white">
    <animate attributeName="opacity" values="0.2;1;0.2" dur="2s" begin="0s" repeatCount="indefinite"/>
  </circle>
  <circle class="star" cx="400" cy="120" r="2" fill="white">
    <animate attributeName="opacity" values="0.2;1;0.2" dur="2s" begin="0s" repeatCount="indefinite"/>
  </circle>
  <circle class="star" cx="500" cy="60" r="2" fill="white">
    <animate attributeName="opacity" values="0.2;1;0.2" dur="2s" begin="0s" repeatCount="indefinite"/>
  </circle>
  <circle class="star" cx="600" cy="150" r="2" fill="white">
    <animate attributeName="opacity" values="0.2;1;0.2" dur="2s" begin="0s" repeatCount="indefinite"/>
  </circle>
  <circle class="star" cx="700" cy="70" r="2" fill="white">
    <animate attributeName="opacity" values="0.2;1;0.2" dur="2s" begin="0s" repeatCount="indefinite"/>
  </circle>
  <circle class="star" cx="150" cy="200" r="2" fill="white">
    <animate attributeName="opacity" values="0.2;1;0.2" dur="2s" begin="0s" repeatCount="indefinite"/>
  </circle>
  <circle class="star" cx="250" cy="180" r="2" fill="white">
    <animate attributeName="opacity" values="0.2;1;0.2" dur="2s" begin="0s" repeatCount="indefinite"/>
  </circle>
  <circle class="star" cx="350" cy="200" r="2" fill="white">
    <animate attributeName="opacity" values="0.2;1;0.2" dur="2s" begin="0s" repeatCount="indefinite"/>
  </circle>
  <circle class="star" cx="450" cy="190" r="2" fill="white">
    <animate attributeName="opacity" values="0.2;1;0.2" dur="2s" begin="0s" repeatCount="indefinite"/>
  </circle>
  <circle class="star" cx="550" cy="170" r="2" fill="white">
    <animate attributeName="opacity" values="0.2;1;0.2" dur="2s" begin="0s" repeatCount="indefinite"/>
  </circle>
  <circle class="star" cx="100" cy="150" r="2" fill="white">
    <animate attributeName="opacity" values="0.2;1;0.2" dur="2s" begin="0s" repeatCount="indefinite"/>
  </circle>
  <circle id="moon" cx="650" cy="150" r="40" fill="#ffd700"/>
  <circle id="glow" cx="650" cy="150" r="40" fill="url(#moonGlow)" opacity="0.4">
    <animate attributeName="r" values="40;80;40" dur="8s" repeatCount="indefinite"/>
  </circle>
  <g id="shootingStar">
    <line x1="-100" y1="150" x2="-100" y2="150" stroke="yellow" stroke-width="2"/>
    <path d="M 0,0 L 2,7 L 9,7 L 3,14 L 6,21 L 0,15 L -6,21 L -3,14 L -9,7 L -2,7 Z" fill="yellow"/>
  </g>
  <animateTransform attributeName="transform" type="translate" from="-100" to="800" dur="4s" begin="0.5s" repeatCount="indefinite"/>
</svg>
Reasoning trace (11,355 tokens)
We need to produce an SVG with viewBox 0 0 800 600. Must be self-contained, no external references, no JS. Use SMIL animations (animate, animateTransform, etc.) or CSS (but CSS inside <style>). Since we can't use external resources, we can embed CSS in <style> tag.

We need: fox sitting on a hill, looking at moon on starry night. Include moon with soft glow, many stars, hill, trees, distant hills. Use coherent palette, at least one gradient. Animations: stars twinkling (maybe using opacity or scale), fox tail swaying gently (maybe using animateTransform on tail path), shooting star crossing sky every 4 seconds (first within 2 seconds). All loops seamlessly.

We need to ensure the SVG is valid and runs in Chrome. Use SMIL animations: <animate> for opacity, <animateTransform> for rotation/scale. For stars twinkling, we can animate opacity (fade in/out) and maybe scale. For each star, we can define separate <animate> tags.

For tail swaying: define a path for tail, then apply an animateTransform with type="rotate" around a point near the tail base, with values from -10 to 10 degrees, repeat indefinite.

Shooting star: we can create a line path for the star's trail, animate its position from left to right, maybe with a <animate> on the line's x1/x2 or use a <line> that moves. Or we can create a <path> for the star shape and animate its x position. Simpler: create a <line> that moves across sky, and animate its x2 coordinate (or x1) from -100 to 800, with a duration of 4 seconds, repeat.

First shooting star within 2 seconds: we can set begin="0.5s" or use <animate> with dur="4s" and begin="0.5s". Or we can have multiple <animate> with different begin times.

Stars twinkling: each star can have <animate> on opacity with values 0.2 to 1, dur maybe 2s, repeat indefinite, with additive="sum". Or we can use <animate> with values "0.2;1;0.2" and keyTimes. Simpler: animate opacity from 0.2 to 1 and back, with dur "2s" and repeatCount="indefinite". But need seamless loop; we can use <animate> with values "0.2;1;0.2" and keyTimes "0;0.5;1". That loops.

Tail swaying: animateTransform rotate from -10 to 10 degrees, with dur "6s" maybe, repeat indefinite, additive="sum". Or we can have two rotations: -10 to 10 and back.

Moon glow: maybe use radial gradient for glow, animate its opacity or blur? Could animate the radial gradient's r attribute. Or animate the circle's radius? Simpler: use <animate> on the circle's r to make glow pulse: from 120 to 150 and back, with dur "8s" maybe.

We need at least one gradient: we can define a radial gradient for moon glow, and maybe for hill shading.

Color palette: dark blues for night sky, light yellow for moon, orange/red for fox, green for trees/hill.

Let's design elements:

- Background: rectangle for sky (dark blue) covering whole viewBox.

- Moon: a circle with fill (light yellow) and a radial gradient for glow (maybe using <radialGradient> with colors white to transparent). The moon circle itself can have animate on its r (glow) or on a <circle> with fill and a <animate> on its opacity? Let's create a <circle> for moon with fill="yellow" and a <circle> for glow with fill="white" and animate its radius.

Simplify: Use one <circle> for moon with fill="lightyellow". Then a <radialGradient> defined for glow, and apply to a <circle> with larger radius and lower opacity, animate its radius.

Stars: many <circle> elements with small radius (2-3) placed randomly. We'll animate each star's opacity.

Tail: path for fox tail, with animateTransform rotate.

Fox: we need to draw a fox shape. Let's create a simple stylized fox: head with ears, snout, body, tail. Use paths. The tail will be a curved path with a white tip (maybe a small circle at end). The tail will have an animateTransform rotate around a point near its base (like the fox's hip). We'll need to define the tail path and apply rotate.

Hill: a shape (maybe a polygon) for hill, colored green/brown.

Trees: simple triangles for pine trees, placed on hill.

Distant hills: maybe another polygon shape with lighter color.

Let's sketch coordinates.

ViewBox 0 0 800 600.

Sky: rectangle from (0,0) to (800,600) fill dark blue (#0b1d36).

Moon: position maybe at (650, 150). Radius maybe 40. We'll add glow.

Stars: we can place many stars: e.g., at coordinates (200,100), (300,80), (400,120), (500,60), (600,150), (700,70), (150,200), (250,180), (350,200), (450,190), (550,170). We'll animate each star's opacity.

Tail swaying: We'll need to define the tail path. Let's design fox body: maybe at (350,400) sitting. Tail extends to the right (or left). Let's say tail goes from body to the right and curves upward. We'll define a path like "M 380 420 C 420 440 460 420 500 400". That's a curved tail. The base point is at (380,420). We'll apply rotate around (380,420). The tail will rotate from -10 to 10 degrees.

Shooting star: we can create a line from left side (x=-100, y=150) to right side (x=800+100, y=150) but animate only the star part. Simpler: create a <line> with x1= -100, y1=150, x2=800, y2=150 (horizontal). Then animate x2 from 800 to 800+200 (so star moves off-screen) maybe with a small star shape at the end. But we need a shooting star shape: maybe a star shape (5-point) at the moving point. Simpler: create a <path> for a star shape (like "M 0,0 L 2,7 L 9,7 L 3,14 L 6,21 L 0,15 L -6,21 L -3,14 L -9,7 L -2,7 Z") and animate its x position from -100 to 800, with duration 4s, begin 0.5s. The star shape will be the shooting star.

But we need to ensure the star shape is visible. Let's create a star path and animate its x coordinate (or both x1 and x2). Let's define star shape at (x,y) and animate its x position.

Simplify: Use a <g> with a star shape and animate the group's transform translateX.

But maybe easier: create a <line> for the trail, animate its x2 from -100 to 800+200 (so it moves across). The star shape can be at the right end, but we need to animate its position as part of the line. Let's create a <line> with x1 = -100, y1 = 150, x2 = -100 (starting off-screen left), y2 = 150. Then animate x2 from -100 to 800 (duration 4s) and also animate the line's stroke-dasharray to create a trailing effect? Not needed.

But we need the shooting star to appear within 2 seconds first. So we can set begin="0.5s". The line will start moving after 0.5s and complete in 4s. That's okay.

Now, ensure all animations loop seamlessly: stars twinkling loops, tail swaying loops, shooting star repeats every 4 seconds (first after 0.5s). The tail swaying should be continuous loop; we can set repeatCount="indefinite". For the shooting star, we can set repeatCount="indefinite" and also set <animate> with dur="4s" and begin="0.5s". However, if we set repeatCount indefinite, the first animation will start after 0.5s, then repeat every 4s. That's fine.

Now, ensure no external resources, all inline.

We need at least one gradient: we will define a radial gradient for moon glow.

Let's draft the SVG.

We'll start with <svg xmlns="http://www.w3.org/2000/svg" viewBox="0 0 800 600" width="800" height="600">.

Inside, <defs> with <linearGradient> maybe for hill shading, and <radialGradient> for moon glow.

Define radial gradient: id="moonGlow", with stops: stop at 0% #ffffff (or light yellow), stop at 100% #ffffff00 (transparent). We'll animate the radius of a circle using this gradient? Actually we can animate the radius of a circle that uses the gradient as fill (maybe with low opacity). Simpler: we can animate the radius of a circle that has fill="url(#moonGlow)". The circle's radius will increase and decrease.

Define <circle id="moon" cx="650" cy="150" r="40" fill="yellow" /> and <circle id="glow" cx="650" cy="150" r="40" fill="url(#moonGlow)" />. Then animate the r attribute of glow from 40 to 80 and back, with dur maybe 8s, repeat indefinite.

But we need the glow to be soft; we can set the glow circle's fill to white with low opacity (0.5). Let's set fill="white" and animate its r.

Alternatively, we can animate the circle's opacity.

Simplify: Use <circle id="moon" cx="650" cy="150" r="40" fill="yellow" /> and animate its opacity from 0.8 to 1 and back (soft glow). But the requirement says "soft glow", maybe we can animate the radius of a larger circle with low opacity.

Let's do: <circle id="glow" cx="650" cy="150" r="40" fill="white" opacity="0.4" /> and animate its r from 40 to 80 and back.

Define <animate attributeName="r" values="40;80;40" dur="8s" repeatCount="indefinite" />

Now stars: we will create a group of stars with <circle> elements, each with animate on opacity.

Define a function to create a star: <circle class="star" cx="..." cy="..." r="2" fill="white"> <animate attributeName="opacity" values="0.2;1;0.2" dur="2s" begin="0s" repeatCount="indefinite" /> </circle>

We need many stars; let's place maybe 12 stars.

Now fox: Let's define fox body. We'll create a group <g id="fox"> containing paths.

Simplify: Use <path> for head, ears, snout, body, tail.

Fox sitting: maybe at (350,420). Let's design:

- Head: ellipse or path.

We'll create:

<path d="M 350,420 C 340,400 360,380 380,380" fill="#d35400"/> (head shape). Then ears: two triangles.

Ears: <path d="M 350,380 L 340,360 L 355,370 Z" fill="#d35400"/> (left ear) and similar for right ear.

Snout: maybe a small ellipse.

But to keep it simple, we can use a simplified fox shape: a body shape (like a curved shape) and a tail.

Let's design a fox shape using <path>:

Body: "M 350,420 C 380,440 420,440 450,420" (a curve). Fill color #d35400.

Tail: "M 450,420 C 480,440 520,420 560,400" then curve to tip with white tip.

We need tail to sway: we will animate the rotation of the tail path. To do that, we need to apply an animateTransform to the tail group (or to the tail path itself). Let's wrap tail path in a <g> with id="tailGroup". Then animateTransform rotate around the base point (maybe the first point of tail). The rotate will be from -10 to 10 degrees.

Define <g id="tailGroup"> <path d="M 450,420 C 480,440 520,420 560,400" stroke="#d35400" stroke-width="6" fill="none"/> </g>

Then <animateTransform attributeName="transform" type="rotate" from="-10" to="10" dur="6s" repeatCount="indefinite" additive="sum" />

But we need to set the transform origin. The rotate transform rotates around the element's transform origin, which is its center by default. That may not be ideal; we want to rotate around the tail base (the point where tail attaches to body). To set that, we can translate the tail group so that its base is at (0,0) then rotate, then translate back. Simpler: we can apply rotate to the tail path directly, but the rotation center will be the path's bounding box center, not the base. However, if we set the tail path's anchor point at the base (the first point) by using transform-box? That's complex.

Alternative: we can animate the rotation of the whole fox group, but that would rotate the whole fox, not just tail. Not good.

Maybe we can define the tail as a <path> and apply an animateTransform with "rotate" and specify "additive" and "from" and "to". The rotation center is the element's transform origin, which is the element's center. To have the tail rotate around its base, we can set the tail's transform-origin via a <g> that translates the tail so that its base is at the origin, then rotate, then translate back. Simpler: we can use <g> with transform="translate(450,420)" then the path's coordinates are relative to that translation, and then animate rotate around (0,0). Let's do:

<g id="tailGroup" transform="translate(450,420)">
  <path d="M 0,0 C 30,20 50,0 70,-10" stroke="#d35400" stroke-width="6" fill="none"/>
</g>

Then animateTransform rotate from -10 to 10 around (0,0). That will rotate the tail around its base (the point where tail attaches). The coordinates are relative, so rotation will be around the translation point (the base). Good.

Now we need to ensure the tail group is positioned correctly relative to fox body. The tail path's coordinates are from (0,0) to (70,-10). That's fine.

Now the fox body: we need to draw the fox's body shape. Let's define a <path> for the body: maybe a simplified shape: "M 350,420 C 380,440 420,440 450,420" (a curve). Fill color #d35400. That's the torso.

Now the fox's head: maybe a shape like "M 350,420 C 340,400 340,380 360,380" etc. Let's design:

Head: "M 350,420 C 340,400 340,380 360,380" (a curve). Fill #d35400.

Ears: two triangles.

Left ear: "M 345,380 L 335,360 L 345,370 Z". Right ear: "M 355,380 L 365,360 L 355,370 Z". Fill same.

Snout: maybe a small ellipse: <ellipse cx="355" cy="385" rx="10" ry="6" fill="#d35400"/>.

Now the fox's legs: maybe simple lines or shapes.

Legs: "M 380,440 L 380,460" (front leg) and "M 430,440 L 430,460" (back leg). Fill same.

Tail group: as described.

Now we need to ensure the fox is sitting on a hill. The hill can be a polygon shape: maybe a greenish shape with a brownish top.

Define hill: <polygon points="0,500 200,400 400,500 600,420 800,500 800,600 0,600" fill="#6b8e23"/> (green). Or we can have two hills: a foreground hill and a distant hill.

Distant hills: maybe a lighter shape at the top: <polygon points="0,300 200,250 400,300 600,280 800,300 800,600 0,600" fill="#8fbc8f"/> with lower opacity.

Trees: simple pine trees: triangle shape with trunk.

Tree 1: placed on hill at (250,450). Use <polygon points="250,450 260,430 270,450 265,420 255,420 260,400" fill="#228b22"/> and trunk <rect x="260" y="450" width="10" height="30" fill="#8b4513"/>.

Tree 2: at (550,460) similar.

Now stars: many circles.

Now we need to ensure all animations loop seamlessly. For stars, each star's animate on opacity may not be perfectly seamless if the values are not symmetric. Let's define values "0.2;1;0.2" and keyTimes "0;0.5;1". That ensures fade in to full brightness at halfway, then fade out. That loops.

But we need to set begin times maybe random? Not required. All stars can start at 0s.

Now shooting star: We'll create a <line> with id="shootingStar" and animate its x2 attribute from -100 to 800 (duration 4s). Also animate its stroke-dasharray maybe to create a trail, but not needed. The star shape will be at the right end of the line (the moving point). To make it look like a shooting star, we can add a star shape at the moving point, but we can also animate the line's stroke-dashoffset to create a tail. Simpler: we can animate the line's x2 and also animate the star shape's x position (if we have a separate star shape). Let's create a star shape (5-point) and animate its x position.

Define star shape path: "M 0,0 L 2,7 L 9,7 L 3,14 L 6,21 L 0,15 L -6,21 L -3,14 L -9,7 L -2,7 Z". We'll place it at the moving point: we can use a <g> that contains the star shape and the line, and animate the group's transform translateX.

Simplify: create a <g id="shootingStar"> <line x1="-100" y1="150" x2="-100" y2="150" stroke="yellow" stroke-width="2"/> <path d="M 0,0 L 2,7 L 9,7 L 3,14 L 6,21 L 0,15 L -6,21 L -3,14 L -9,7 L -2,7 Z" fill="yellow"/> </g>

Then animate the group's transform: <animateTransform attributeName="transform" type="translate" from="-100" to="800" dur="4s" begin="0.5s" repeatCount="indefinite" />

But this will move the whole group (line + star) horizontally, which is fine. The star will appear at the right end after moving.

However, we need the shooting star to cross the sky, not just move horizontally; maybe we want a diagonal path. But horizontal is okay.

Now ensure that the first shooting star appears within 2 seconds: we set begin="0.5s". That's okay.

Now we need to ensure the SVG is valid and runs without errors. We'll need to test mentally.

Potential issues:

- The tail swaying: we need to set the rotate values correctly. The tail group is translated to (450,420). The path coordinates go from (0,0) to (70,-10). The rotation will be around (0,0). The tail will swing left/right.

- The fox's tail tip is white; we need a white tip at the end of tail. We can add a small circle at the tail tip (the last point of path). Let's add <circle cx="70" cy="-10" r="4" fill="white"/> inside tailGroup.

- The fox's ears: need to be pointy; we have triangles.

- The moon glow: we need a radial gradient for soft glow. Let's define <radialGradient id="moonGlow" cx="50%" cy="50%" r="50%"> <stop offset="0%" stop-color="white" stop-opacity="0.8"/> <stop offset="100%" stop-color="white" stop-opacity="0"/> </radialGradient>. Then the glow circle will use this gradient as fill, with low opacity maybe.

But we need at least one gradient; we have that.

Now ensure the color palette is coherent: dark blue sky (#0b1d36), moon yellow (#ffd700), fox orange (#d35400), hill green (#6b8e23), trees dark green (#228b22), distant hills lighter green (#8fbc8f), stars white (#ffffff), moon glow white.

Now we need to ensure the SVG viewBox is 0 0 800 600. All elements coordinates must be within that.

Let's draft the SVG step by step.

We'll start with <svg xmlns="http://www.w3.org/2000/svg" viewBox="0 0 800 600" width="800" height="600">.

Then <defs>:

- radial gradient for moon glow: <radialGradient id="moonGlow" cx="50%" cy="50%" r="50%" gradientUnits="userSpaceOnUse"> <stop offset="0%" stop-color="white" stop-opacity="0.8"/> <stop offset="100%" stop-color="white" stop-opacity="0"/> </radialGradient>

- maybe also a linear gradient for hill shading, but not needed.

Now the sky rectangle: <rect width="800" height="600" fill="#0b1d36"/>.

Moon: <circle id="moon" cx="650" cy="150" r="40" fill="#ffd700"/> (yellow). Then glow circle: <circle id="glow" cx="650" cy="150" r="40" fill="url(#moonGlow)" opacity="0.4"/> We'll animate its radius.

Animate glow radius: <animate attributeName="r" values="40;80;40" dur="8s" repeatCount="indefinite" />

Now stars: we need to create many star circles. Let's define a function to create each star with class "star". We'll place them.

We'll create 12 stars:

1. cx="200" cy="100" r="2"
2. cx="300" cy="80" r="2"
3. cx="400" cy="120" r="2"
4. cx="500" cy="60" r="2"
5. cx="600" cy="150" r="2"
6. cx="700" cy="70" r="2"
7. cx="150" cy="200" r="2"
8. cx="250" cy="180" r="2"
9. cx="350" cy="200" r="2"
10. cx="450" cy="190" r="2"
11. cx="550" cy="170" r="2"
12. cx="100" cy="150" r="2"

Each will have <animate> on opacity.

Define <circle class="star" cx="200" cy="100" r="2" fill="white"> <animate attributeName="opacity" values="0.2;1;0.2" dur="2s" begin="0s" repeatCount="indefinite" /> </circle>

Similarly for others, maybe set different begin times to avoid all starting at same moment, but not required. We'll set begin="0s" for all.

Now fox group: <g id="fox">

- Body path: <path d="M 350,420 C 380,440 420,440 450,420" fill="#d35400"/>

- Head path: <path d="M 350,420 C 340,400 340,380 360,380" fill="#d35400"/>

- Left ear: <path d="M 345,380 L 335,360 L 355,370 Z" fill="#d35400"/> (maybe need to adjust coordinates). Let's design more accurate ear shapes.

Better: left ear: <path d="M 345,380 L 335,360 L 340,370 Z" fill="#d35400"/> (triangle). Right ear: <path d="M 355,380 L 365,360 L 360,370 Z" fill="#d35400"/>.

- Snout: <ellipse cx="355" cy="385" rx="10" ry="6" fill="#d35400"/> (maybe a small ellipse). Or we can use a path.

- Front leg: <path d="M 380,440 L 380,460" stroke="#d35400" stroke-width="6" fill="none"/> (line). Similarly back leg: <path d="M 430,440 L 430,460" stroke="#d35400" stroke-width="6" fill="none"/>.

- Tail group: <g id="tailGroup" transform="translate(450,420)"> <path d="M 0,0 C 30,20 50,0 70,-10" stroke="#d35400" stroke-width="6" fill="none"/> <circle cx="70" cy="-10" r="4" fill="white"/> </g>

- Animate tail sway: <animateTransform attributeName="transform" type="rotate" from="-10" to="10" dur="6s" repeatCount="indefinite" additive="sum" />

Now hill: <polygon points="0,500 200,400 400,500 600,420 800,500 800,600 0,600" fill="#6b8e23"/> (green hill). Also distant hills: <polygon points="0,300 200,250 400,300 600,280 800,300 800,600 0,600" fill="#8fbc8f" opacity="0.6"/> (lighter green with opacity). Ensure the distant hills are behind the foreground hill; order matters: distant hills should be drawn after foreground hill? Actually we want distant hills behind the foreground hill, so we draw distant hills first (lower z-order) then foreground hill. In SVG, later elements are on top. So we need to place distant hills before foreground hill.

Thus order: sky rect, distant hills polygon, foreground hill polygon, trees, fox, stars, moon, glow, shooting star.

But we also need to ensure the fox sits on hill: the hill polygon includes the area where fox sits. The fox's y coordinate (420) is above the hill's top (which goes up to 400 at x=200, 420 at x=600). The fox's body is at y=420, which is on the hill's top line (the hill shape). That's fine.

Now trees: we need to place them on hill.

Tree 1: <polygon points="250,450 260,430 270,450 265,420 255,420 260,400" fill="#228b22"/> (triangle). Trunk: <rect x="260" y="450" width="10" height="30" fill="#8b4513"/>.

Tree 2: <polygon points="550,460 560,440 570,460 555,430 545,430 550,410" fill="#228b22"/> (maybe adjust). Trunk: <rect x="560" y="460" width="10" height="30" fill="#8b4513"/>.

Now shooting star: <g id="shootingStar"> <line x1="-100" y1="150" x2="-100" y2="150" stroke="yellow" stroke-width="2"/> <path d="M 0,0 L 2,7 L 9,7 L 3,14 L 6,21 L 0,15 L -6,21 L -3,14 L -9,7 L -2,7 Z" fill="yellow"/> </g> <animateTransform attributeName="transform" type="translate" from="-100" to="800" dur="4s" begin="0.5s" repeatCount="indefinite" />

Now we need to ensure the shooting star moves across the sky. The line is at y=150, which is near the moon's vertical position (moon at y=150). That's okay; the shooting star will cross the sky near the moon.

Now we need to ensure all animations are looped seamlessly. Let's verify each:

- Stars: each star's opacity animates from 0.2 to 1 to 0.2 over 2s, repeating. That's fine.

- Tail: rotate from -10 to 10 over 6s, repeat indefinite. That's fine.

- Moon glow: radius from 40 to 80 to 40 over 8s, repeat indefinite. That's fine.

- Shooting star: translate from -100 to 800 over 4s, begin 0.5s, repeat indefinite. That means after first 0.5s, it moves across in 4s, then repeats (starting again after 4.5s). That's fine.

Now ensure the SVG is valid: all IDs unique, no duplicate IDs.

Potential issue: The tail group's transform origin may not be exactly at the base; but we set translate(450,420) so the path's coordinates are relative to that point. The rotate will rotate around (0,0) which is the translation point (the base). So tail will sway around its attachment point.

Now ensure the fox's tail tip white circle is inside tailGroup; that's fine.

Now ensure the fox's ears are pointy: we have triangles.

Now ensure the fox's snout: maybe we need a small shape to represent snout; we have an ellipse.

Now ensure the fox's legs: we used lines; maybe we need to fill them to be visible. Use <path> with fill same as body.

Let's adjust legs: <path d="M 380,440 L 380,460" fill="#d35400"/> (instead of stroke). That will be filled.

Now ensure the fox's body shape is closed; we used a curve but not closed. The path may not be closed; we need to close the path to have fill. Let's make the body path start and end at same point: "M 350,420 C 380,440 420,440 450,420 Z". That closes the shape.

Similarly head path: "M 350,420 C 340,400 340,380 360,380 Z". That closes.

Now ears: they are triangles; they are closed.

Now ensure the tail path is closed? Not needed; it's a stroke path.

Now ensure the hill polygon is closed; we have points that form a closed shape.

Now ensure the distant hills polygon is closed.

Now ensure the trees are closed.

Now ensure the shooting star group: line and path are separate; we need to animate the group, but the line may not move if we animate the group's transform; the line's x1 and x2 will move accordingly because the group moves. However, we set line's x1 and x2 as -100 and -100; after translation, they become (group x + -100). The group's transform is translate(x). So line's x1 will be -100 + groupX. At start groupX = -100, line x1 = -200, x2 = -200 (off-screen left). At end groupX = 800, line x1 = 700, x2 = 700 (off-screen right). That's okay; the line will move across.

But we also have the star shape within the group; its coordinates are relative to group, so it will move as well.

Now ensure the star shape's coordinates are appropriate: we defined path "M 0,0 L 2,7 L 9,7 L 3,14 L 6,21 L 0,15 L -6,21 L -3,14 L -9,7 L -2,7 Z". This shape is centered at (0,0). When the group translates, the star will move accordingly.

Now ensure the star shape's fill is yellow, same as line.

Now ensure the shooting star appears within 2 seconds: begin 0.5s, so first star appears at 0.5s, which is within 2 seconds. Good.

Now ensure the page looks right in 1280x800 viewport and adapts to 375px width. Since we have viewBox 800x600, the SVG will scale proportionally. The content is centered; no horizontal scrollbar.

Now ensure there are no console errors: we must avoid using any external resources, no JS, no alert, etc. All good.

Now we need to output exactly one fenced code block with the SVG code. No extra text.

Let's write the full SVG code.

We'll need to be careful with indentation but it's okay.

Let's construct the code.

First line: <svg xmlns="http://www.w3.org/2000/svg" viewBox="0 0 800 600" width="800" height="600">

Then <defs>:

<radialGradient id="moonGlow" cx="50%" cy="50%" r="50%" gradientUnits="userSpaceOnUse">
  <stop offset="0%" stop-color="white" stop-opacity="0.8"/>
  <stop offset="100%" stop-color="white" stop-opacity="0"/>
</radialGradient>

Now the sky rect: <rect width="800" height="600" fill="#0b1d36"/>

Now distant hills polygon: <polygon points="0,300 200,250 400,300 600,280 800,300 800,600 0,600" fill="#8fbc8f" opacity="0.6"/>

Now foreground hill polygon: <polygon points="0,500 200,400 400,500 600,420 800,500 800,600 0,600" fill="#6b8e23"/>

Now trees:

Tree 1 polygon: <polygon points="250,450 260,430 270,450 265,420 255,420 260,400" fill="#228b22"/>
Tree 1 trunk: <rect x="260" y="450" width="10" height="30" fill="#8b4513"/>

Tree 2 polygon: <polygon points="550,460 560,440 570,460 555,430 545,430 550,410" fill="#228b22"/>
Tree 2 trunk: <rect x="560" y="460" width="10" height="30" fill="#8b4513"/>

Now fox group:

<g id="fox">

Body path: <path d="M 350,420 C 380,440 420,440 450,420 Z" fill="#d35400"/>

Head path: <path d="M 350,420 C 340,400 340,380 360,380 Z" fill="#d35400"/>

Left ear: <path d="M 345,380 L 335,360 L 340,370 Z" fill="#d35400"/>
Right ear: <path d="M 355,380 L 365,360 L 360,370 Z" fill="#d35400"/>

Snout: <ellipse cx="355" cy="385" rx="10" ry="6" fill="#d35400"/>

Front leg: <path d="M 380,440 L 380,460" fill="#d35400"/>
Back leg: <path d="M 430,440 L 430,460" fill="#d35400"/>

Tail group: <g id="tailGroup" transform="translate(450,420)">
  <path d="M 0,0 C 30,20 50,0 70,-10" stroke="#d35400" stroke-width="6" fill="none"/>
  <circle cx="70" cy="-10" r="4" fill="white"/>
</g>

Animate tail sway: <animateTransform attributeName="transform" type="rotate" from="-10" to="10" dur="6s" repeatCount="indefinite" additive="sum"/>

Now stars: we need to create each star circle with animate.

Let's define them:

<circle class="star" cx="200" cy="100" r="2" fill="white">
  <animate attributeName="opacity" values="0.2;1;0.2" dur="2s" begin="0s" repeatCount="indefinite"/>
</circle>

<circle class="star" cx="300" cy="80" r="2" fill="white">
  <animate attributeName="opacity" values="0.2;1;0.2" dur="2s" begin="0s" repeatCount="indefinite"/>
</circle>

<circle class="star" cx="400" cy="120" r="2" fill="white">
  <animate attributeName="opacity" values="0.2;1;0.2" dur="2s" begin="0s" repeatCount="indefinite"/>
</circle>

<circle class="star" cx="500" cy="60" r="2" fill="white">
  <animate attributeName="opacity" values="0.2;1;0.2" dur="2s" begin="0s" repeatCount="indefinite"/>
</circle>

<circle class="star" cx="600" cy="150" r="2" fill="white">
  <animate attributeName="opacity" values="0.2;1;0.2" dur="2s" begin="0s" repeatCount="indefinite"/>
</circle>

<circle class="star" cx="700" cy="70" r="2" fill="white">
  <animate attributeName="opacity" values="0.2;1;0.2" dur="2s" begin="0s" repeatCount="indefinite"/>
</circle>

<circle class="star" cx="150" cy="200" r="2" fill="white">
  <animate attributeName="opacity" values="0.2;1;0.2" dur="2s" begin="0s" repeatCount="indefinite"/>
</circle>

<circle class="star" cx="250" cy="180" r="2" fill="white">
  <animate attributeName="opacity" values="0.2;1;0.2" dur="2s" begin="0s" repeatCount="indefinite"/>
</circle>

<circle class="star" cx="350" cy="200" r="2" fill="white">
  <animate attributeName="opacity" values="0.2;1;0.2" dur="2s" begin="0s" repeatCount="indefinite"/>
</circle>

<circle class="star" cx="450" cy="190" r="2" fill="white">
  <animate attributeName="opacity" values="0.2;1;0.2" dur="2s" begin="0s" repeatCount="indefinite"/>
</circle>

<circle class="star" cx="550" cy="170" r="2" fill="white">
  <animate attributeName="opacity" values="0.2;1;0.2" dur="2s" begin="0s" repeatCount="indefinite"/>
</circle>

<circle class="star" cx="100" cy="150" r="2" fill="white">
  <animate attributeName="opacity" values="0.2;1;0.2" dur="2s" begin="0s" repeatCount="indefinite"/>
</circle>

Now moon:

<circle id="moon" cx="650" cy="150" r="40" fill="#ffd700"/>

<circle id="glow" cx="650" cy="150" r="40" fill="url(#moonGlow)" opacity="0.4">
  <animate attributeName="r" values="40;80;40" dur="8s" repeatCount="indefinite"/>
</circle>

Now shooting star:

<g id="shootingStar">
  <line x1="-100" y1="150" x2="-100" y2="150" stroke="yellow" stroke-width="2"/>
  <path d="M 0,0 L 2,7 L 9,7 L 3,14 L 6,21 L 0,15 L -6,21 L -3,14 L -9,7 L -2,7 Z" fill="yellow"/>
</g>
<animateTransform attributeName="transform" type="translate" from="-100" to="800" dur="4s" begin="0.5s" repeatCount="indefinite"/>

Now we need to ensure that the shooting star's line and star are visible; maybe we need to set the line's stroke to yellow and the star fill to yellow.

Now we need to ensure that the shooting star's line is visible across the sky; maybe we need to set its y coordinate to something like 150 (same as moon). That's fine.

Now we need to ensure that the shooting star's group is not interfering with other elements; it's fine.

Now check for any missing closing tags.

Let's count:

- <svg> ... </svg>

- <defs> ... </defs>

- <rect> ... </rect>

- <polygon> distant hills

- <polygon> foreground hill

- <polygon> tree1

- <rect> trunk1

- <polygon> tree2

- <rect> trunk2

- <g id="fox"> ... </g>

- <g id="tailGroup"> ... </g>

- <animateTransform> for tail

- <circle class="star"> ... (multiple)

- <circle id="moon"> ... </circle>

- <circle id="glow"> ... </circle>

- <g id="shootingStar"> ... </g>

- <animateTransform> for shooting star

Now ensure all tags are closed.

Potential missing closing tags: The <g id="fox"> must close after its children. The tailGroup is inside fox, so after tailGroup we close the fox group.

Now ensure the star circles are outside fox group; they are after fox group.

Now ensure the moon and glow are after stars; order doesn't matter but fine.

Now ensure the shooting star group is after everything else; fine.

Now ensure that the radial gradient definition is inside <defs>.

Now ensure that the radial gradient's id is "moonGlow". The glow circle uses fill="url(#moonGlow)". Good.

Now ensure that the tail sway animation uses additive="sum". That's okay.

Now ensure that the shooting star's translate animation uses from="-100" to="800". That's fine.

Now ensure that the star twinkling animation uses values "0.2;1;0.2". That's fine.

Now ensure that the tail rotation uses from="-10" to="10". That's fine.

Now ensure that the moon glow radius uses values "40;80;40". That's fine.

Now ensure that the shooting star's line is at y=150, which is near the moon's vertical position; the star shape may overlap the moon but that's okay.

Now ensure that the fox's tail tip white circle is visible; yes.

Now ensure that the fox's ears are pointy; yes.

Now ensure that the fox's snout is visible; yes.

Now ensure that the hill is visible; yes.

Now ensure that the trees are visible; yes.

Now ensure that the stars are many; yes.

Now ensure that the moon glow pulses; yes.

Now ensure that the shooting star crosses every 4 seconds; yes.

Now ensure that the first shooting star appears within 2 seconds; yes (0.5s).

Now ensure that the page looks right in 1280x800 viewport; the SVG is 800x600 viewBox, will scale to fill width, maintain aspect ratio. In 1280x800, the SVG will be scaled to width 1280, height 960 (maintaining aspect ratio 4:3). The content will be centered, no horizontal scrollbar.

Now ensure that the page adapts gracefully down to 375px width; the SVG will scale down, still fit.

Now ensure that there are no console errors: all elements are defined, no external resources, no JS.

Now we need to output exactly one fenced code block with the SVG code. No extra text.

Let's write the final SVG code.

Be careful with indentation and ensure that all attributes are properly quoted.

Let's produce the final answer.