North Mini Code (free)
by CohereReasoningClean
Running live in a sandboxed frame. Click inside it before using the keyboard.
How it went
- Total time
- 2 min 52 s
- Cost
- $0
- Output tokens
- 31,553
- Spent thinking
- 24,131 tokens
- Speed
- 183.8 tok/s
- Console errors
- 0
- First token after
- 436 ms
- First visible text after
- 2 min 34 s
- Prompt tokens
- 506
- Code size
- 6.5 KB
- Finish reason
- stop
- Served by
- Cohere
- Model id
cohere/north-mini-code:free- Reasoning sent
model default- Max output
- 32,000 tokens
- Generated
- Nov 9, 2026
What it was asked
The prompt
Create a standalone SVG illustration of a fox sitting on a hill, looking at the moon on a starry night, with a few subtle animations. Requirements: - Output a single valid .svg file (```svg code block) with a viewBox of 0 0 800 600. - Hand-written shapes and paths only: no embedded raster images, no external references, no JavaScript. - The fox must be clearly recognizable (pointy ears, snout, bushy tail with a white tip). - Include the moon with a soft glow, many stars, the hill and some background elements (trees, distant hills). - Use a coherent color palette and at least one gradient. - Animations (SMIL or CSS inside the SVG), all looping seamlessly: stars twinkling, the fox's tail swaying gently, and a shooting star crossing the sky every 4 seconds (the first one within 2 seconds).
System prompt, sent with every prompt
You are generating a self-contained web demo. It will be rendered automatically in a sandboxed iframe and compared side by side with the output of other AI models given the exact same task.

Output rules:
- Reply with exactly ONE fenced code block containing the complete file: ```html (or ```svg when the task asks for an SVG). No text before or after the code block.
- Everything must be inline: CSS in <style>, JavaScript in <script>. No external files, images, fonts or network requests, except the CDN URLs explicitly allowed by the task.
- Do not use localStorage, sessionStorage, cookies, IndexedDB, alert(), confirm(), prompt() or window.open(): they are blocked in the sandbox and will throw.
- The page must look right in a 1280×800 viewport and adapt gracefully down to 375px wide. No horizontal scrollbar.
- Something meaningful must be visible on first paint: a screenshot is taken automatically about 3 seconds after load, without any interaction.
- Everything that makes the demo interesting must be visible within the first seconds: nothing hidden behind a high score, a later level or a long play session.
- Games must start in a self-playing demo mode (a simple AI plays) behind a "Click or press a key to start" message, so the game can be judged in action without playing.
- The iframe only receives keyboard events after the user clicks it: if the demo uses the keyboard, display a clear "Click or press a key to start" message.
- The code must run with zero errors in the console of the latest Chrome.
Code run-1.svg · 154 lines
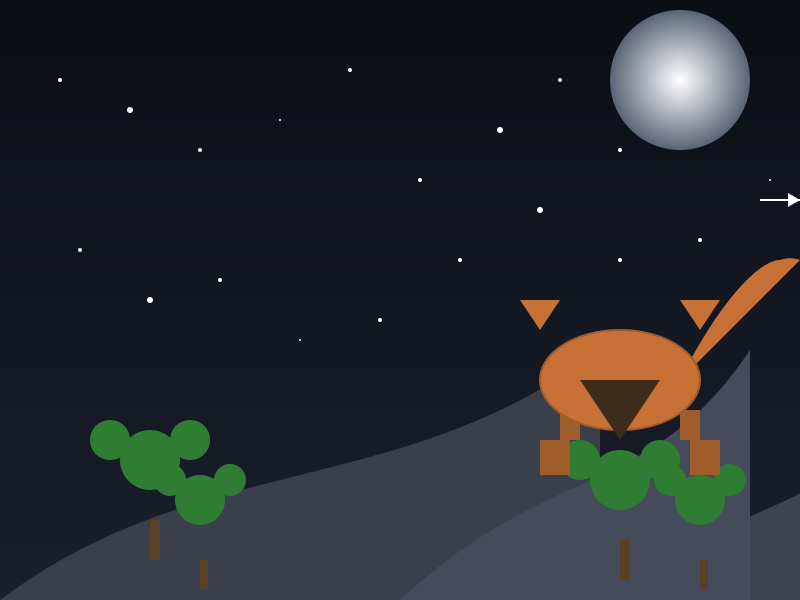
<svg xmlns="http://www.w3.org/2000/svg" viewBox="0 0 800 600">
  <defs>
    <linearGradient id="skyGradient" x1="0%" y1="0%" x2="0%" y2="100%">
      <stop offset="0%" stop-color="#0b0e14"/>
      <stop offset="100%" stop-color="#1a1f2c"/>
    </linearGradient>
    <radialGradient id="moonGradient" cx="50%" cy="50%" r="50%" fx="50%" fy="50%">
      <stop offset="0%" stop-color="#fff"/>
      <stop offset="100%" stop-color="#5a6475"/>
    </radialGradient>
    <filter id="moonGlow">
      <feGaussianBlur stdDeviation="4" result="blur"/>
      <feMerge>
        <feMergeNode in="blur"/>
        <feMergeNode in="SourceGraphic"/>
      </feMerge>
    </filter>
  </defs>

  <!-- Sky background -->
  <rect x="0" y="0" width="800" height="600" fill="url(#skyGradient)"/>

  <!-- Stars with twinkling -->
  <circle cx="60" cy="80" r="2" fill="white">
    <animate attributeName="opacity" values="0;1;0" dur="2s" repeatCount="indefinite"/>
  </circle>
  <circle cx="130" cy="110" r="3" fill="white">
    <animate attributeName="opacity" values="0;1;0" dur="2s" repeatCount="indefinite"/>
  </circle>
  <circle cx="200" cy="150" r="2" fill="white">
    <animate attributeName="opacity" values="0;1;0" dur="2s" repeatCount="indefinite"/>
  </circle>
  <circle cx="280" cy="120" r="1" fill="white">
    <animate attributeName="opacity" values="0;1;0" dur="2s" repeatCount="indefinite"/>
  </circle>
  <circle cx="350" cy="70" r="2" fill="white">
    <animate attributeName="opacity" values="0;1;0" dur="2s" repeatCount="indefinite"/>
  </circle>
  <circle cx="420" cy="180" r="2" fill="white">
    <animate attributeName="opacity" values="0;1;0" dur="2s" repeatCount="indefinite"/>
  </circle>
  <circle cx="500" cy="130" r="3" fill="white">
    <animate attributeName="opacity" values="0;1;0" dur="2s" repeatCount="indefinite"/>
  </circle>
  <circle cx="560" cy="80" r="2" fill="white">
    <animate attributeName="opacity" values="0;1;0" dur="2s" repeatCount="indefinite"/>
  </circle>
  <circle cx="620" cy="150" r="2" fill="white">
    <animate attributeName="opacity" values="0;1;0" dur="2s" repeatCount="indefinite"/>
  </circle>
  <circle cx="700" cy="100" r="2" fill="white">
    <animate attributeName="opacity" values="0;1;0" dur="2s" repeatCount="indefinite"/>
  </circle>
  <circle cx="770" cy="180" r="1" fill="white">
    <animate attributeName="opacity" values="0;1;0" dur="2s" repeatCount="indefinite"/>
  </circle>
  <circle cx="80" cy="250" r="2" fill="white">
    <animate attributeName="opacity" values="0;1;0" dur="2s" repeatCount="indefinite"/>
  </circle>
  <circle cx="150" cy="300" r="3" fill="white">
    <animate attributeName="opacity" values="0;1;0" dur="2s" repeatCount="indefinite"/>
  </circle>
  <circle cx="220" cy="280" r="2" fill="white">
    <animate attributeName="opacity" values="0;1;0" dur="2s" repeatCount="indefinite"/>
  </circle>
  <circle cx="300" cy="340" r="1" fill="white">
    <animate attributeName="opacity" values="0;1;0" dur="2s" repeatCount="indefinite"/>
  </circle>
  <circle cx="380" cy="320" r="2" fill="white">
    <animate attributeName="opacity" values="0;1;0" dur="2s" repeatCount="indefinite"/>
  </circle>
  <circle cx="460" cy="260" r="2" fill="white">
    <animate attributeName="opacity" values="0;1;0" dur="2s" repeatCount="indefinite"/>
  </circle>
  <circle cx="540" cy="210" r="3" fill="white">
    <animate attributeName="opacity" values="0;1;0" dur="2s" repeatCount="indefinite"/>
  </circle>
  <circle cx="620" cy="260" r="2" fill="white">
    <animate attributeName="opacity" values="0;1;0" dur="2s" repeatCount="indefinite"/>
  </circle>
  <circle cx="700" cy="240" r="2" fill="white">
    <animate attributeName="opacity" values="0;1;0" dur="2s" repeatCount="indefinite"/>
  </circle>

  <!-- Distant hills -->
  <path d="M0,600 C200,450 400,500 600,350 L600,600 Z" fill="#3a3f4b"/>
  <path d="M600,600 C800,460 900,520 800,350 L800,600 Z" fill="#3e434c"/>

  <!-- Near hill (where fox sits) -->
  <path d="M400,600 C550,460 650,500 750,350 L750,600 Z" fill="#454b5a"/>

  <!-- Trees -->
  <!-- Tree 1 -->
  <g id="tree1">
    <rect x="150" y="520" width="10" height="40" fill="#5a4025"/>
    <circle cx="150" cy="460" r="30" fill="#2e7d32"/>
    <circle cx="110" cy="440" r="20" fill="#2e7d32"/>
    <circle cx="190" cy="440" r="20" fill="#2e7d32"/>
  </g>
  <!-- Tree 2 -->
  <g id="tree2">
    <rect x="620" y="540" width="10" height="40" fill="#5a4025"/>
    <circle cx="620" cy="480" r="30" fill="#2e7d32"/>
    <circle cx="580" cy="460" r="20" fill="#2e7d32"/>
    <circle cx="660" cy="460" r="20" fill="#2e7d32"/>
  </g>
  <!-- Tree 3 (distant left) -->
  <g id="tree3">
    <rect x="200" y="560" width="8" height="30" fill="#5a4025"/>
    <circle cx="200" cy="500" r="25" fill="#2e7d32"/>
    <circle cx="170" cy="480" r="16" fill="#2e7d32"/>
    <circle cx="230" cy="480" r="16" fill="#2e7d32"/>
  </g>
  <!-- Tree 4 (distant right) -->
  <g id="tree4">
    <rect x="700" y="560" width="8" height="30" fill="#5a4025"/>
    <circle cx="700" cy="500" r="25" fill="#2e7d32"/>
    <circle cx="670" cy="480" r="16" fill="#2e7d32"/>
    <circle cx="730" cy="480" r="16" fill="#2e7d32"/>
  </g>

  <!-- Fox legs (optional) -->
  <rect x="560" y="410" width="20" height="30" fill="#a05d2c"/>
  <rect x="680" y="410" width="20" height="30" fill="#a05d2c"/>
  <rect x="540" y="440" width="30" height="35" fill="#a05d2c"/>
  <rect x="690" y="440" width="30" height="35" fill="#a05d2c"/>

  <!-- Fox tail group (behind body) -->
  <g id="tailGroup" transform="translate(680,380)">
    <path id="tailMain" d="M0,0 C40,-80 80,-120 100,-120 A30,30 0 0 1 120,-120 Z" fill="#c77136"/>
    <path id="tailTip" d="M120,-120 L150,-120 L135,-140 Z" fill="#ffffff"/>
    <animateTransform attributeName="transform" type="rotate" values="0 0 0; -15 0 0; 15 0 0; 0 0 0" dur="2s" repeatCount="indefinite"/>
  </g>

  <!-- Fox body -->
  <ellipse cx="620" cy="380" rx="80" ry="50" fill="#c77136" stroke="#a05d2c" stroke-width="2"/>

  <!-- Fox ears -->
  <polygon points="540,330 520,300 560,300" fill="#c77136"/>
  <polygon points="700,330 720,300 680,300" fill="#c77136"/>

  <!-- Fox snout -->
  <polygon points="580,380 660,380 620,440" fill="#3e2c1d"/>

  <!-- Moon with glow -->
  <circle cx="680" cy="80" r="70" fill="url(#moonGradient)" filter="url(#moonGlow)"/>

  <!-- Shooting star -->
  <g id="shootingStarGroup" transform="translate(800,200)">
    <line x1="0" y1="0" x2="-40" y2="0" stroke="white" stroke-width="2"/>
    <path d="M0,0 L-12,-7 L-12,7 Z" fill="white"/>
    <animateTransform attributeName="transform" type="translate" values="800,200 -200,200" dur="4s" begin="2s" repeatCount="indefinite"/>
  </g>
</svg>
Reasoning trace (24,131 tokens)
The user wants an SVG illustration with a fox sitting on a hill, looking at the moon on a starry night. Must be a single valid .svg file with viewBox 0 0 800 600. Hand-written shapes and paths only, no raster images, no external references, no JavaScript. Should have clearly recognizable fox: pointy ears, snout, bushy tail with a white tip. Include moon with soft glow, many stars, hill and some background elements (trees, distant hills). Use coherent color palette and at least one gradient. Animations: SMIL or CSS inside the SVG, all looping seamlessly: stars twinkling, fox's tail swaying gently, and a shooting star crossing the sky every 4 seconds (first one within 2 seconds). Should be self-contained, no external assets, just inline SVG.

We need to output a single SVG code block, presumably starting with `<svg xmlns="http://www.w3.org/2000/svg" viewBox="0 0 800 600">` and ending with `</svg>`. No JavaScript allowed, just SMIL or CSS inside.

The constraint: The content must be in a single fenced code block of type svg. So we should output:

```svg
<svg ...>
...
</svg>
```

Inside, we need to create the illustration with shapes. Because we cannot use any external images or scripts, we will use `<path>` for the fox, the hill, trees, moon, stars. Use `<defs>` for gradients. Use `<animate>` or `<animateTransform>` etc for animations.

We need to ensure that the viewBox is 0 0 800 600.

The fox: typical fox shape can be created with shapes: a body (oval), ears (triangles), snout (tri), tail (curved shape). We can make tail swaying using `<animateTransform>` on group `<g>`.

Stars: many small circles, with twinkle animation using `<animate attributeName="opacity" ...>` loop.

Shooting star: a line moving across sky, or a small shape moving, with a duration of 4 seconds (starting within 2 seconds). We can use `<animate>` to move a line from right to left across the SVG.

Moon: large circle with gradient (maybe a radial gradient for glow). Soft glow can be achieved using a `<feGaussianBlur>` inside `<filter>`? But we can just use a gradient fill with some glow effect. We can use `<defs><radialGradient id="moonGradient"><stop offset="0%" stop-color="#fff"/> <stop offset="100%" stop-color="#e0e0ff"/></radialGradient></defs>` and then fill `<circle cx="650" cy="80" r="70" fill="url(#moonGradient)" />`. Also we can add a filter for blur to simulate glow: `<filter id="glow"><feGaussianBlur stdDeviation="4" result="blur"/><feMerge><feMergeNode in="blur"/><feMergeNode in="SourceGraphic"/></feMerge></filter>` then apply `filter="url(#glow)"` on the moon. That would create a soft glow.

We need coherent color palette: perhaps background sky dark blue to black, hills in dark green to brown, trees dark green, fox in orange/russet, tail white tip. Stars white or light yellow. Moon bright white with gradient.

Animations: star twinkling: each star can have small opacity changes via `<animate attributeName="opacity" values="0.2;1;0.2" dur="2s" repeatCount="indefinite"/>`. Or using `<animateTransform>` for twinkling? Actually opacity is fine.

Fox's tail swaying gently: We can wrap the tail part in a group `<g id="tailGroup">` and apply `<animateTransform attributeName="transform" attributeType="XML" type="rotate" from="0 -5" to="10 5" dur="2s" repeatCount="indefinite"/>`. But note that the tail should swing left and right, perhaps using `rotate`. Use simple rotation.

Shooting star: a small line moving across sky. Could be a thin `<line>` or `<path>`. Use `<animate>` to move its position. For simplicity, we can create a shooting star as a path that moves across the sky. Use `<path d="M-20 200 L20 200" stroke="white" stroke-width="2"/>` maybe with a tail spark. Or we can have a small ellipse representing star and a tail. We can have a `<path id="shootingStar" d="M0 0 L-20 -5 L-30 0 L-20 5 Z" fill="white"/>` then animate its transform: translate from right to left across the sky. For example, we can set its transform attribute to `translate` with `<animate attributeName="transform" attributeType="XML" type="translate" values="800,0 0,0; -800,0 0,0" dur="4s" begin="-1s" repeatCount="indefinite"/>`. But we need the first shooting star within 2 seconds, then every 4 seconds. So we can set `begin=".5s"` for first, then repeat after 4s. For simplicity, we can set `begin="2s"` for the first star, then `dur="4s" repeatCount="indefinite"`, so first at 2 seconds, then repeats at 6,10,...

The shooting star should cross the sky from right to left. Use `translate` animation.

Alternatively, use `<animateTransform attributeName="transform" type="translate" values="800,150 0,0; -800,150 0,0" dur="4s" begin="2s" repeatCount="indefinite"/>` attached to a group that contains the star shape.

But we need to ensure that the shooting star appears as a separate element, not interfering with other elements. We can make a group `<g id="shootingStarGroup">` with the star shape and tail. Then apply animation to the group.

Now let's plan the components.

### Background Sky
We can fill the background with a dark gradient: `<rect x="0" y="0" width="800" height="600" fill="url(#skyGradient)"/>`. The gradient could be linear from dark blue at bottom to near-black at top.

### Distant Hills
Add a group for hills: using curves (<path>) that appear as hills on the bottom half of the SVG. Use color for hill fill: a dark green-brown, perhaps `fill="#4a4f57"` or something.

### Trees
Trees: group of circles and triangles (like foliage). For each tree, we can have a trunk (`<rect>` brown) and foliage (`<circle>` green). Use a few trees scattered.

### Moon
Place moon near top right: circle with gradient and glow filter.

### Stars
Several small circles (<circle r="2-4") with white or light yellow fill. Add twinkling animation: using `<animate attributeName="opacity" values="0;1;0" dur="2s" repeatCount="indefinite"/>`. Variation in durations for each star for natural effect.

### Fox
The fox should be on the hill, perhaps near the middle right side. We need to draw the fox: body oval, ears, snout, legs, tail.

We can break down the fox into several `<path>` elements. The shape can be somewhat simplified but still recognizable. We'll incorporate pointy ears (triangular shapes), snout (triangle). Body: an oval shape with orange/reddish brown color: maybe `#d48520` for the fur. Tail: a curved shape, with white tip.

Fox's tail: we can design a path that is a curved shape for the main tail, then a white segment at tip. We also need to apply swaying animation: apply `<animateTransform attributeName="transform" attributeType="XML" type="rotate" values="0 0 0; -15 0 0; 15 0 0; 0 0 0" dur="2s" repeatCount="indefinite"/>` on the tail group.

Alternatively, we can animate the tail as a rotation around a point near its base. For simplicity, we can apply a simple rotation to the tail group: `<g id="tailGroup" transform="translate(tailBaseX, tailBaseY)"> then rotate. We'll need to compute the base point. But we can just rotate the tail path about its center. Using `<animateTransform attributeName="transform" type="rotate" from="0 0 0" to="-15 0 0" dur="2s" repeatCount="indefinite"/>` maybe with values "0 0 0; -15 0 0; 15 0 0; 0 0 0". However, rotation about the origin (0,0) may not give natural swaying; better to rotate about a point on the fox's body. We could use `transform-origin` by setting `<animateTransform attributeName="transform" type="rotate" values="0 200 150; -15 200 150; 15 200 150; 0 200 150" dur="2s" repeatCount="indefinite"/>`. Where (200,150) is the base near the fox's body.

We can compute approximate fox location. Let's decide to place the fox at coordinates x ~300, y ~300 on the hill. The hill shape may be something like a curve that meets the fox.

Let's define hills: maybe two hills, left and right, with curves. Use paths that fill the bottom half.

Better to design the entire SVG step by step.

**Outline:**

- `<svg xmlns="http://www.w3.org/2000/svg" viewBox="0 0 800 600">`
- `<defs>` for gradients and filters.
   - LinearGradient #skyGradient: from #0b0e14 (dark blue) to #1a1f2c (slightly lighter).
   - RadialGradient #moonGradient: center white, outer light blue/gray.
   - Filter #moonGlow: blur and merge.
- `<rect x="0" y="0" width="800" height="600" fill="url(#skyGradient)"/>` as background.

- `<path id="hill1" d="..." fill="#3a3f4b"/>` for first hill. Actually we can have multiple hills.

- `<path id="hill2" d="..." fill="#454b5a"/>` maybe.

- Trees: group of trees with `<path>` shapes.

- Moon: `<circle cx="680" cy="80" r="70" fill="url(#moonGradient)" filter="url(#moonGlow)"/>`.

- Stars: set of `<circle>` elements with varying positions and animation. For simplicity, we can generate many small circles at random positions; but we need to embed coordinates manually. We can manually place maybe 30-40 stars.

- Fox: group of shapes. To avoid complexity, we could use several `<path>` for each part. The fox must be clearly recognizable: pointy ears, snout, bushy tail with white tip.

We'll create the fox using a combination of `<path>` and `<circle>` for eyes perhaps.

Define coordinates: The fox sits on a hill. Let's decide its body position: around x=250, y=340 (the hill). Height maybe 150 (overall). The fox's body shape: an oval for the torso: `<path d="M230,380 Q260,340 300,340 Q340,360 380,340 Q410,380 380,420 Q340,460 300,420 Q260,380 230,380 Z"` (maybe). We can design a simplified shape.

Better approach: For simplicity, we can create the fox using primitive shapes: `<ellipse>` for body, `<polygon>` for ears, `<polygon>` for snout, `<path>` for tail.

But we need to use only hand-written shapes/paths. Using `<ellipse>` is allowed (it's a shape). So we can use `<ellipse>` for body. The tail can be a `<path>` with curve. For ears, `<polygon>` triangles. For snout, `<polygon>`. For legs, maybe simple lines.

However, the requirement is "hand-written shapes and paths only: no embedded raster images, no external references". Using `<ellipse>` and `<polygon>` is allowed (they are vector shapes). So we can use them.

But we might want to have shading for the fox? Not required. Just the shape. Use a coherent color palette. The fox can be `fill="#c77136"` for the body (some orange-brown). Ears maybe `#c77136` as well, but a bit darker `#a05d2c`. Snout maybe black or dark brown `#3e2c1d`. Tail maybe orange-brown with white tip.

The tail: we can create a path for the tail shape: a curved shape starting from body, extending outwards, with a white tip segment near the end. Let's design a tail: The main tail thickness: similar to body but narrower and longer. Use a path like: M250,360 C260,340 280,300 300,300 Q330,340 340,360 ... Actually we need a bushy tail. We can make a shape: starting near the back of the fox (around (330,380) maybe) and curving outward.

Better to define the fox's back side: The fox's body will have a back at x~340, y~380 (or something). The tail would start at that point and go outwards.

Given the complexity, maybe we can simplify: Draw the fox as a single `<path>` that outlines the whole fox shape, including ears, snout, tail. But that might be complex but doable. However, we need to ensure the tail swaying animation can be applied to the tail. If we use a single path for the whole fox, animating only the tail part would be tricky. We can group the tail shape separately and animate that group.

Thus we should separate tail.

We could design:

- Body: `<ellipse cx="280" cy="380" rx="80" ry="40" fill="#c77136" />` (like an oval oriented horizontally maybe).

But a fox is not symmetrical; its body is more elongated. But a simple oval could be acceptable if we add ears and snout.

Alternatively, use `<path>` for body plus other parts. I think using `<path>` for each part provides better control.

**Fox parts design details:**

Let's design the fox shape step by step.

We can approximate the fox shape from typical side view: The fox sits on its hind legs? Or maybe it's sitting with all four legs? Usually a fox sits upright, looking. For simplicity, we can have the fox oriented with front half raised? It might be easier to have a sitting pose: the fox's body is upright, tail curved upward.

Better to have the fox sitting on its hind legs, looking forward. However, drawing that might be more complex. It might be simpler to have the fox lying down? But fox sitting on hill, looking at the moon. Could be sitting upright.

We can create the fox as a group of shapes: Body (oval), ears (triangles on top), snout (triangle), legs (short lines), tail (curved shape). This is fairly simple.

**Body:** We can use `<ellipse cx="260" cy="380" rx="80" ry="50" fill="#c77136" stroke="#a05d2c" stroke-width="2"/>` (maybe with stroke). However, using stroke is optional. The requirement does not require outlines, but they help with shape recognition. We can keep fill only.

**Ears:** Two triangles on top of head. For the first ear: points at (220,340) for base, (200,300) tip, (240,340) base. Or something. Use fill maybe `#c77136` (same as body). So `<polygon points="220,340 200,300 240,340" fill="#c77136"/>`. The second ear: mirrored at (340,340 360,300 320,340`. Use same.

**Snout:** A triangle pointing downwards: base points at (260,380) and (300,380), tip at (280,410). Fill maybe `#3e2c1d` (dark brown). So `<polygon points="260,380 300,380 280,410" fill="#3e2c1d"/>`.

**Legs:** Simple lines or shapes. For each leg: maybe small rectangles. But to keep minimal, we could omit legs; but a fox might look odd without legs. But shape recognizability might still be okay with body, ears, snout, tail. However, legs help.

We could add simple `<rect>` for each leg: front left leg: rectangle at (250,420) width=20 height=30 fill="#a05d2c". Front right leg: rectangle at (310,420) width=20 height=30 fill="#a05d2c". Back left leg: rectangle at (240,440) width=30 height=40 fill="#a05d2c". Back right leg: rectangle at (320,440) width=30 height=40 fill="#a05d2c". But that might clutter. However, we can include minimal leg shapes: maybe just short lines.

But the fox could be recognizable even without legs if it's more stylized. Could be okay.

**Tail:** The tail should be bushy, with white tip. We can create a path that is a rounded shape: starting from the back of the body (approx at (340,380)), then curving out to the right (or left) and downwards, with a white tip at the end.

We can design the tail shape as a curved shape using `M` and `C` commands. Let's design a tail that extends to the right and slightly down. Suppose the tail starts at point (340,380) (the back-right of the body). Then we can draw a curve to (380,340) and then to (360,300). Then the tail fan out near the tip: we could have a series of curves that fan out.

Alternatively, we can define a simple shape: the tail is a rectangle with rounded ends. But to make it look bushy, we could use a shape like: M340,380 C360,350 380,340 390,340 Q380,360 370,380 Z. That may not look bushy enough.

Better: We can design a tail with a path that includes a main thick segment and a white tip.

The tail's main segment: Could be a shape like: starting from (340,380), go out to (380,350), then draw curves outward to form a fan. However, easier approach: Use a path that approximates a simple tail: a semi-circle on a stick. For a bushy tail, we can create a shape like a semi-ellipse.

Simplify: Use `<path d="M340,380 Q380,340 380,300 C380,260 360,260 360,260 L380,260 A30,30 0 0 1 410,290 L380,300 Z" fill="#c77136"/>` This might be too complex.

Better: Use a shape that looks like a thick curved line with a rounded tip: Use a path that draws a curved line (like a "C" shape) and then a small circular shape at the tip. But shape must be hand-drawn and fillable. The tail could be drawn using an ellipse at the tip and a line connecting to body.

We could use two shapes: a line (stroke) for tail and a circle for tip. However, we want filled shape for tail. Could combine: `<path d="M340,380 Q380,350 380,300 C380,250 360,250 360,250 L380,250 A30,30 0 0 1 410,280 Z" fill="#c77136"/>` and then another `<path d="M380,300 A30,30 0 0 1 410,280 L410,260 A20,20 0 0 1 390,280 Z" fill="#ffffff"/>` for white tip.

But maybe we can simplify: The tail is a simple shape: a thick curved line that ends in a white tip.

We can create a tail using two paths: a main body path, then a white tip path.

**Tail main body:** We'll approximate a tail as a curved shape: Starting at point (340,380) (near the fox's back), go outwards and upward slightly, then curve down. Something like:

M340,380 C380,340 380,300 380,260 L380,260 A30,30 0 0 1 410,230 Z

But let's think about the shape. The fox is sitting upright, tail may extend to the side or upward. For visual interest, we can have tail extending upward to the right, maybe curling upward. So we can start at (340,380) and draw a path that goes up to (380,340), then curves outward and upward to (380,260). Then draw a rounded tip: a semi-ellipse at the end: maybe a circle at (380,260) radius 30.

Simplify: Use `<path d="M340,380 C380,340 380,260 380,260 A30,30 0 0 1 410,260 Z" fill="#c77136"/>` to form a C shape with a rounded tip.

But we also need a white tip at the very end. We could have the tail tip be white, maybe half of the tail. We can split the tail into two parts: the main orange part, then a white tip further out. So we can have tail main part: from (340,380) to (380,260). Then white tip: from (380,260) outward: maybe a semicircle or a shape that fans out.

We could design tail main part: `<path id="tailMain" d="M340,380 C380,340 380,260 380,260 A30,30 0 0 1 410,260 Z" fill="#c77136"/>`. Then white tip: `<path id="tailTip" d="M380,260 A30,30 0 0 1 410,260 L410,230 A30,30 0 0 1 380,230 Z" fill="#ffffff"/>`. The white tip is a simple triangular shape attached to the main tail.

Alternatively, we could make tail tip as a white circle with gradient. But we need white tip specifically.

Better to make the tail tip a white shape that continues the tail. For simplicity, we can use a white triangle extending from the main tail.

Thus tail: the main part is orange, the tip is white.

**Tail swaying animation:** The tail group (including both main and tip) should sway. So we can wrap both tail paths in a `<g id="tailGroup">` and apply `<animateTransform attributeName="transform" type="rotate" values="0 340 380; -15 340 380; 15 340 380; 0 340 380" dur="2s" repeatCount="indefinite"/>`. This rotates the tail about a point (340,380) which can be the base of tail (the point where tail meets the fox's body). That will cause natural swaying.

**Star Twinkling:** For each star, we can create `<circle>` with `r="2"` (or varying radii). We can set `opacity="0"` initially and animate to 1. Use `<animate attributeName="opacity" values="0;1;0" dur="2s" repeatCount="indefinite"/>`. To vary, we can offset each star's begin attribute: e.g., `begin="${i*0.2}s"` to offset start times.

**Shooting Star:** We can create a group `<g id="shootingStarGroup" transform="translate(800,200)">` containing a small shape (e.g., a thin white line with a star head). Then apply `<animateTransform attributeName="transform" type="translate" values="0,0; -900,0; 0,0" dur="4s" begin="2s" repeatCount="indefinite"/>`. Or we can use `<animateTransform attributeName="transform" type="translate" values="800,200 0,200; -800,200 0,200" dur="4s" begin="2s" repeatCount="indefinite"/>`. Actually we can set initial `transform="translate(800,200)"` and then animate to `translate(-200,200)`? Or just translate from right off-screen to left off-screen. Use `translate(800,200)` to start off-screen right, then move to `-200,200` (off left). But the viewBox width is 800, so coordinate 800 is off right, -200 is off left. So animation: values="800,200 -200,200" dur="4s" begin="2s" repeatCount="indefinite". This will move the shooting star across. The shape: we could use a small `<path>` like `<path d="M0,0 L-10,-5 L-10,5 Z"` (a triangle) for head, and a line tail: `<line x1="0" y1="0" x2="-30" y2="0" stroke="white" stroke-width="2"/>`. But we can combine both in one group. We need no JavaScript, just SMIL.

Simplify: Shooting star group has a small `<path>` shape representing the star head: `<path d="M0,0 L-15,-5 L-15,/pol? Actually we can do: d="M0,0 L-12,-7 L-12,7 Z"` for a triangle. Then a tail line: `<line x1="0" y1="0" x2="-40" y2="0" stroke="white" stroke-width="2"/>`.

We need to make sure the tail line and head are white to be visible against dark sky. So fill head with white, stroke maybe none.

So `<g id="shootingStarGroup" transform="translate(800,200)">` then inside: `<line x1="0" y1="0" x2="-40" y2="0" stroke="white" stroke-width="2"/>` and `<path d="M0,0 L-12,-7 L-12,7 Z" fill="white"/>`. The line extends leftwards as the shooting star moves. As the group translates left, the line will appear to trail behind.

However, we might want the tail to be drawn behind the head? Actually line is behind? Not important.

We can also add a small glow effect on the shooting star using `<filter>` but not needed.

**Background Elements:** Distant hills: we can have two hill shapes with subtle texture. For example, left hill: a path like `M0,600 L200,400 C300,600 400,500 600,600 L800,600 L800,600 V600 Z`. But we need to fill them with a dark green or brown. The hills should be behind the fox (so lower z-order). In SVG, order of elements matters. We can place hills first, then trees, then moon, then stars, then fox and tail, then shooting star on top maybe.

**Trees:** We can create tree foliage using circles and a trunk. For each tree: trunk: `<rect x="x" y="y" width="8" height="40" fill="#5a4025"/>`. Foliage: one large circle at top: `<circle cx="x" cy="y-50" r="30" fill="#2e7d32"/>`. Another smaller circle left: `<circle cx="x-20" cy="y-80" r="20" fill="#2e7d32"/>`. Another right: `<circle cx="x+20" cy="y-80" r="20" fill="#2e7d32"/>`. So each tree is a group.

We'll place a few trees along the horizon: left side hills, maybe also in middle.

**Ensuring no horizontal scrollbar**: viewBox 0 0 800 600, width/height likely set to 100% of container. Should be fine.

**Animations**: Use SMIL `<animate>` and `<animateTransform>`. No CSS inside SVG? The requirement says "SMIL or CSS inside the SVG". We could also use CSS inside `<style>` for star twinkling: set `animation: twink 2s infinite`. But need to ensure no JavaScript. Both are fine. However, SMIL is simpler for shooting star and tail swaying. We'll stick with SMIL.

- For star twinkling: `<animate attributeName="opacity" from="0" to="1" begin="0s" dur="2s" repeatCount="indefinite"/>` with values "0;1;0". Or we could use `<animate attributeName="opacity" values="0;1;0" dur="2s" repeatCount="indefinite"/>`.

But we need to offset each star. We can use `begin` attribute on each star group.

- For tail swaying: use `<animateTransform>` in the tail group.

- For shooting star: we need start within 2 seconds (first star appears after 2 seconds). The shooting star will appear as a group that is initially placed off screen right (translate 800, y). We can apply `<animateTransform>` that moves left across. The first start time: set `begin="2s"` on the animation (the translate animation). That ensures the first crossing occurs at 2 seconds. Then repeat every 4 seconds.

**Time to design the specific paths and coordinates**.

We'll start constructing the SVG.

### Define viewBox

We'll use `<svg xmlns="http://www.w3.org/2000/svg" viewBox="0 0 800 600" preserveAspectRatio="xMidYMid meet">`. However, preserveAspectRatio is optional.

### Define Gradients

We'll have sky gradient (linear): start color #0b0e14 at top, to #1a1f2c at bottom.

```
<defs>
  <linearGradient id="skyGradient" x1="0%" y1="0%" x2="0%" y2="100%">
    <stop offset="0%" stop-color="#0b0e14"/>
    <stop offset="100%" stop-color="#1a1f2c"/>
  </linearGradient>
  <radialGradient id="moonGradient" cx="50%" cy="50%" r="50%" fx="50%" fy="50%">
    <stop offset="0%" stop-color="#fff"/>
    <stop offset="100%" stop-color="#5a6475"/>
  </radialGradient>
  <filter id="moonGlow">
    <feGaussianBlur stdDeviation="4" result="blur"/>
    <feMerge>
      <feMergeNode in="blur"/>
      <feMergeNode in="SourceGraphic"/>
    </feMerge>
  </filter>
</defs>
```

### Background

`<rect x="0" y="0" width="800" height="600" fill="url(#skyGradient)"/>`

### Distant Hills (two hills maybe left and right)

We need hill shapes that sit at bottom of view. The hills can be created using `<path>` with large curves.

First hill: left hill covering left side. Something like:

Path: M0,600 C150,500 250,550 400,500 S650,450 800,600 L800,600 V600 Z

Actually we need to be careful: The hill shape should be like a gentle rise. For left hill: starting from left bottom (0,600), go up to a peak near x=200, y=450, then down to right bottom (400,600). Then close to bottom.

Simplify: Use a cubic Bezier for left hill: M0,600 C150,450 250,500 400,400 L400,600 Z. Then right hill: M400,600 C550,450 650,500 800,400 L800,600 Z. But we need to ensure they don't overlap too much.

Alternatively, we can design hills as two larger curves: left hill: M0,600 C200,400 400,500 600,600 L800,600 L800,600 V600 Z.

Actually, we can use two hills: left hill at left side, right hill at right side, maybe with a valley between.

Better: Use a path for the ground: M0,600 L0,600 Q400,300 800,600 L800,600 Z. That would be one big hill in middle. But we also want distant hills: maybe multiple layers.

We can have two hill layers: background hills (distant) and nearer hills. The fox sits on a hill (the nearest). So we need a hill for the fox to sit on. That hill should be near the middle right.

Thus design:

- Distant hills: maybe two light-colored hills far away, at bottom.

- Foreground hill: a larger, more detailed hill where the fox sits, maybe near the right side.

We can have three hill layers: far left, far right, near.

But the requirement: "the hill and some background elements (trees, distant hills)". So we need a hill (where fox sits) and also distant hills. So we need at least one near hill and some distant hills. So we can have two distant hill shapes (maybe left and far right), and one near hill where fox sits.

**Designing near hill (where fox sits):** We can make a curved shape rising up near the right side, where the fox sits. For example:

Near hill path: M500,600 C600,450 650,500 700,350 L700,600 Z. That creates a hill rising to peak around x=650, y=350. Fox will sit on top of that hill.

**Distant hills:** Could be two shapes: left distant hill: M0,600 C150,450 350,500 500,350 L500,600 Z. Right distant hill: M500,600 C650,450 750,500 800,350 L800,600 Z. These hills are lower (less high) and further back.

We'll set fill for these hills: maybe a darker green or brownish fill: `#3a3f4b`. Or for near hill: a slightly lighter fill: `#454b5a`. Actually we can differentiate between far and near by color, but not required.

**Trees:** Trees can be placed on the near hill and also in the background. We'll create maybe 5-6 trees.

Tree design: Let's create a group for each tree with a trunk and foliage.

For a tree on the near hill (maybe left side of fox), we can define coordinates.

Tree 1 (on near hill left side): trunk at (150,520) width=10 height=40. Foliage: a large circle at (150,460) radius=30; small circles at (110,440) radius=20, and (190,440) radius=20.

Tree 2 (on near hill right side): trunk at (620,540) width=10 height=40. Foliage: large circle at (620,460) radius=30; small circles at (580,440) radius=20, (660,440) radius=20.

We also have background trees maybe further away (distant hills). Could place a couple.

Tree 3 (in distant left hill): trunk at (200,560) width=8 height=30; foliage: large circle at (200,500) radius=25; small circles at (170,480) radius=16, (230,480) radius=16.

Tree 4 (distant right hill): trunk at (700,560) width=8 height=30; foliage: large circle at (700,500) radius=25; small circles at (670,480) radius=16, (730,480) radius=16.

Now the fox sits on near hill (maybe near peak around x~650, y~340). So we need to position the fox accordingly.

Let's define the near hill peak: perhaps near (650,340). So the fox can be placed at (620,380) maybe near the right side of the hill, sitting on the slope.

Alternatively, we can place the fox at (600,380). The tail swaying base point could be (640,380) perhaps.

Define fox components relative to coordinates.

**Fox Body**: We can use `<ellipse cx="600" cy="380" rx="80" ry="45" fill="#c77136" stroke="#a05d2c" stroke-width="2"/>`. This ellipse gives a rounded body shape. Note: The ellipse might be a bit wide; perhaps we want the fox more upright. Actually, we might want a more rectangular or elongated shape.

Alternatively, we can use `<path>` to shape the fox body: Let's design a path that looks like a fox shape:

One approach: Use a shape that is like a rounded rectangle for body, plus ears and snout. Could do:

Body: `<path d="M540,380 Q580,350 620,380 Q660,350 700,380 Q660,430 620,460 Q580,430 540,460 Z"` fill="#c77136". This is a diamond-like shape. But we want a more realistic fox shape.

Alternatively, we can break it down:

- Body: a curved shape: Let's use `<path d="M540,380 C580,340 620,340 660,380 C660,420 620,460 580,460 Q540,430 540,380 Z"` fill="#c77136". This might produce a shape like a rounded rectangle.

Better to use simple shapes: The fox body can be an `<ellipse>` with appropriate size. The ears are triangles on top.

So we will have:

- Body ellipse: `<ellipse cx="600" cy="380" rx="80" ry="50" fill="#c77136" stroke="#a05d2c" stroke-width="2"/>` This is a wide oval.

- Ears: Two triangles above the ellipse.

Ear left: `<polygon points="540,330 520,300 560,300" fill="#c77136"/>` (peak at 520,300). Ear right: `<polygon points="660,330 680,300 640,300" fill="#c77136"/>`.

- Snout: `<polygon points="560,380 640,380 600,440" fill="#3e2c1d"/>`. That gives a downward pointing snout.

- Legs: Two front legs maybe `<rect x="560" y="420" width="20" height="30" fill="#a05d2c"/>` for front left, and `<rect x="620" y="420" width="20" height="30" fill="#a05d2c"/>` for front right. Or we could have back legs too.

- Back legs maybe at lower positions: `<rect x="540" y="440" width="30" height="35" fill="#a05d2c"/>` for back left, and `<rect x="660" y="440" width="30" height="35" fill="#a05d2c"/>` for back right. This gives a more complete posture.

But we have to ensure the fox is not too busy. However, the requirement says "the fox must be clearly recognizable (pointy ears, snout, bushy tail with a white tip)". It doesn't require legs, but they add to recognizability.

We could simplify: remove legs altogether. The fox can be drawn without legs, using body, ears, snout, tail. That might still be recognizable. The shape will be something like a sitting fox with ears and snout but no legs. The tail is key.

But we might want to show the tail and the fox clearly.

Given the complexity of fitting everything, I think using a combination of shapes is acceptable. We need to ensure the illustration is not too cluttered. We need to ensure the fox is recognizable.

Thus we will include the fox body (ellipse), ears (polygons), snout (polygon), tail (path group), maybe minimal legs (optional). We can decide to include legs for completeness.

Now we need to design tail.

**Tail design**: The tail should start at the back of the fox body (the back right side maybe). The fox body ellipse has a rightmost point at x=680 (if center x=600 and rx=80). The back of the fox could be near the rightmost side of the ellipse (i.e., at point (680,380). So we can set the tail base at (680,380). However, the ellipse's topmost point is at y=380? Actually the ellipse center is at (600,380), radius vertical = 50, so topmost y = 380-50 = 330, bottommost y = 430. So the back of the fox is around the rightmost point (x=680, y=380). That's a good base for the tail.

Thus tail base: (680,380). We'll create a tail shape that extends to the right and slightly down/up.

Let's define tail main body: a path from base to tip.

Tail main body path: Use cubic bezier to create a curve: Starting at base point (680,380), go outwards to (720,340) (upwards), then to (730,300) (higher), then to (720,260) (peak), then down to (710,240) maybe. Actually we can design a simple curve: M680,380 C720,340 740,300 760,260 A30,30 0 0 1 790,260 Z. Or simpler: M680,380 C720,340 740,300 770,260 L770,260 A30,30 0 0 1 800,260 Z. But we want a shape.

Simplify: The tail main body could be like a C shape: M680,380 C720,340 740,300 770,260 A30,30 0 0 1 800,260 Z.

But we also need a white tip. We could have the tail tip extend beyond (800,260) to (830,260). The white tip shape: a triangle extending beyond the orange tail.

Thus we can have tail main orange: `<path id="tailMain" d="M680,380 C720,340 740,300 770,260 A30,30 0 0 1 800,260 Z" fill="#c77136"/>`. This is a curved shape ending at a rounded tip at (800,260). Then white tip: `<path id="tailTip" d="M800,260 L830,260 L815,240 Z" fill="#ffffff"/>`. Or we could have a triangle shape.

We need to ensure the tail group includes both tailMain and tailTip, to allow swaying animation.

Thus `<g id="tailGroup" transform="translate(680,380)">` then we need to apply rotate around this base point. However, the group transform currently at base location (x,y) would be relative. The tail's path uses absolute coordinates, which are relative to the origin of the SVG, not relative to group. If we wrap them in a group with transform, the absolute coordinates will be offset accordingly.

Thus we need to place the tail in absolute coordinates (like defined above), but to apply a rotation, we could either transform the whole group with translate to the base point, then rotate, then transform back? Or we could use `<animateTransform>` on the group with attributeName="transform" and type="rotate", providing values like "0 680 380; -15 680 380; 15 680 380; 0 680 380". This will rotate the group around point (680,380). But we need the group to be positioned such that its elements are relative to that point. Usually you would have the group with transform `translate(680,380)` and then inside the group you define the tail path using relative coordinates (e.g., starting at (0,0) for tail base). Then the rotate will be around that origin.

Thus easier: Use relative coordinates for the tail group. Define the tail base at origin (0,0) of group, then define the tail shapes using relative coordinates that start at (0,0). Then apply the rotation animation. Then we translate the whole group to absolute position on the page.

So:

- `<g id="tailGroup" transform="translate(680,380)">
    <path id="tailMain" d="M0,0 C40,-40 60,-80 80,-120 A30,30 0 0 1 100,-120 Z" fill="#c77136"/>
    <path id="tailTip" d="M100,-120 L130,-120 L115,-140 Z" fill="#ffffff"/>
  </g>`

But we need to ensure the tail shape is recognizable and looks like a bushy tail.

Let's design a more realistic tail shape:

- The tail is bushy: a thick base, then splits into a fan at tip.

One approach: use a path that draws a shape like a fan: starting at base (0,0), go outwards to (40,-60) (point up left?), then draw curves to form a fan shape.

We can design a shape similar to a leaf: M0,0 C30,-60 70,-80 80,-120 A30,30 0 0 1 100,-120 Z. That creates a C shape. Then white tip: a triangle extending beyond tip.

But we want a more bushy tail: maybe multiple arcs.

Simplify: Use a shape with a wide top: M0,0 C30,-80 70,-100 80,-130 A40,40 0 0 1 100,-130 Z (C shape). Then white tip: M100,-130 L130,-130 L115,-150 Z.

Alternatively, we could use two overlapping shapes for a fluffier tail: but maybe not needed.

We'll go with simple but recognizable: a thick base that curves upward then down with a pointed tip.

Now, we need to ensure the tail swaying animation works: rotate the group about (0,0) relative to base point.

Thus:

```xml
<g id="tailGroup" transform="translate(680,380)">
  <path id="tailMain" d="M0,0 C40,-80 80,-120 100,-120 A30,30 0 0 1 120,-120 Z" fill="#c77136"/>
  <path id="tailTip" d="M120,-120 L150,-120 L135,-140 Z" fill="#ffffff"/>
</g>
```

But we need to ensure the tail's shape looks like a tail; the "A" arc may not be needed. Use a simpler shape: maybe like a rectangle with rounded ends.

But we can produce a shape like: M0,0 C30,-80 70,-100 100,-120 Q130,-140 150,-120 L150,-140 Q130,-160 100,-180 Z. That's too complex.

Simplify: We can define tail as two arcs: one for the main body (curved shape), and a white tip triangle.

Tail main shape: M0,0 C30,-80 70,-120 100,-120 A30,30 0 0 1 130,-120 Z. This is similar to a C shape: starting at base, curving up and around to tip, creating a curved shape.

We need to ensure the shape is filled. For the A command, we need proper syntax: "A rx ry x-axis-rotation large-arc-flag sweep-flag x y". So "A30,30 0 0 1 130,-120" draws an elliptical arc from current point to (130,-120) with rx=30, ry=30, x-axis-rotation=0, large-arc-flag=0, sweep-flag=1. That will create a quarter circle at the tip. So the shape might look like a semi-circle at tip.

Thus tail shape: M0,0 C30,-80 70,-120 100,-120 A30,30 0 0 1 130,-120 Z. That's a shape that goes from (0,0) up-left to (100,-120) then arcs to (130,-120). The fill will be orange.

Tail tip: triangle extending beyond (130,-120): M130,-120 L160,-120 L145,-140 Z fill=white.

Thus the tail will look like a curved orange tail with a white tip.

Now we need to add animation to tailGroup: rotate about its base point. So we can apply `<animateTransform attributeName="transform" type="rotate" values="0 0 0; -15 0 0; 15 0 0; 0 0 0" dur="2s" repeatCount="indefinite"/>`. This rotates the group around its own origin (the translate point). Since we used `transform="translate(680,380)"` in the group, the rotate will be about that point.

Now the fox body: We'll include the ellipse, ears, snout, maybe legs. However, we also need to ensure the fox is positioned relative to the hill. The fox sits on the hill; we can adjust its y coordinate accordingly.

If the near hill's peak is at around x=650, y=340, we can place the fox at x=620, y=380. That seems plausible.

Now let's design the fox components with coordinates.

**Fox body**: `<ellipse cx="620" cy="380" rx="80" ry="50" fill="#c77136" stroke="#a05d2c" stroke-width="2"/>`

**Fox ears**:

Ear left: `<polygon points="540,330 520,300 560,300" fill="#c77136"/>` (pointy). Ear right: `<polygon points="700,330 720,300 680,300" fill="#c77136"/>`

**Fox snout**: `<polygon points="580,380 660,380 620,440" fill="#3e2c1d"/>`. This gives a downward pointing snout.

**Fox legs**: maybe include simple rectangles.

Front left leg: `<rect x="560" y="410" width="20" height="30" fill="#a05d2c"/>`. Front right leg: `<rect x="680" y="410" width="20" height="30" fill="#a05d2c"/>`. Back left leg: `<rect x="540" y="440" width="30" height="35" fill="#a05d2c"/>`. Back right leg: `<rect x="690" y="440" width="30" height="35" fill="#a05d2c"/>`. But note that these leg rectangles may overlap with tail or body. But we can place them behind the body (i.e., before the body in order). However, the fox should have legs under the body, not above. In SVG, later elements overlay earlier ones. So if we put legs after the body, they may obscure the body. So we need to order them appropriately: first hills, then trees, then legs, then body, then ears, snout, tail (so tail should be on top maybe). Actually tail should be behind the body? Typically the tail extends from the back, so it should be behind the body? In many drawings, the tail may be behind the body but can also be in front. Let's consider typical fox: The tail is attached at the back of the body and extends behind it; the body covers part of the tail. We can put the tail after the body (i.e., behind the body) or before the body (i.e., behind). To have the tail visible, we need to ensure the body doesn't obscure it too much. We can place tail before the body, so the body sits on top of the tail? But the tail is at the back; the body may cover the lower part of tail. Actually the tail extends outward from the back of the body. So the body may cover the base of the tail (the part close to the body), but the rest of the tail should be visible. So we could place the tail group before the body, but after the legs perhaps. However, the body ellipse might obscure the tail if placed later. So we need to ensure the tail is drawn after the body to be visible, but the part of the tail that is behind the body may be occluded. But maybe that's okay.

Let's decide order: first background (sky, hills, trees), then legs (maybe placed after hills but before body to appear behind), then body (ellipse), then ears (maybe after body to appear on top of body), then snout (maybe after ears, but front of fox), then tail (after snout, to appear behind or in front? Usually tail is behind the body, but if we put tail after snout, it may be drawn on top of the body. But we can adjust with layering. However, the tail is at the back, so maybe we want it behind the body. But we can decide to place tail before body but after legs, then the body sits on top of tail. That might be okay: the tail will be partially hidden by body, but the tip will be visible.

But the tail is attached to the back of the body, so the part of tail near the body will be behind the body, but the tip will be visible. So placing tail before the body will cause the body to overlay the tail at the base. That might look correct. But we need to ensure the tail tip is not hidden.

Thus ordering: Background -> Distant hills -> Near hill -> Trees (on hills) -> Legs -> Tail -> Body -> Ears -> Snout -> Stars -> Moon -> Shooting star? Actually the shooting star should be on top of everything maybe. But we can place shooting star near top.

But we can also use z-index ordering: The SVG does not have explicit z-index, but order in markup determines stacking: later elements overlay earlier.

Thus we need to think about the final visual. We want the moon high up, stars scattered across sky, shooting star crossing, hills and trees below, fox on hill visible, tail swaying.

Thus ordering suggestions:

1. Sky background (rect)
2. Distant hills (paths)
3. Near hill (path) - maybe behind the fox but still visible.
4. Trees (groups) - on hills.
5. Fox legs (rects) - below body but above hill.
6. Fox tail (group) - behind body (i.e., before body) but above legs.
7. Fox body (ellipse) - main shape.
8. Fox ears (polygons) - on top of body.
9. Fox snout (polygon) - front of face.
10. Stars (circles) - maybe placed after the fox? Actually stars should be in sky, likely behind the fox and hills? The fox is on a hill at lower part of view, stars are in sky above. So stars should be placed before hills? No, stars are in sky, which is background. So we want stars behind hills and fox? Typically the sky is behind everything else. So stars should be placed before hills. Indeed the sky is the background fill. So stars should be drawn after the sky fill but before hills and fox. So they are behind the hills and fox? Actually if the hills are near the foreground, we want stars behind them. So the order should be: sky fill, stars, distant hills, near hill, trees, fox legs, tail, body, ears, snout, moon (which is in sky, above everything), shooting star (also in sky above everything). However, the moon is near top right, maybe above hills, but we want it on top of everything. So we need to ensure the moon and shooting star are drawn after the fox and hills (i.e., later in markup). So we will place stars early, then hills and trees, then fox, then moon and shooting star near end.

Thus the final order:

- `<rect>` for sky fill
- Star elements (multiple `<circle>` with `<animate>` inside)
- Distant hills paths (maybe two)
- Near hill path
- Trees groups
- Fox legs groups (if any)
- Fox tail group (behind body)
- Fox body ellipse
- Fox ears polygons
- Fox snout polygon
- Moon circle (with filter)
- Shooting star group (with animation)
- Possibly final elements like a final glow or something.

However, we need to ensure that the fox sits on the near hill, which should be visible. So the near hill path must be drawn before the fox, but after the stars and sky.

Now we also need to ensure the fox is recognizable; its body is orange, ears same color, snout dark, tail orange with white tip.

Now we also need to include a gradient somewhere. We already have sky gradient and moon gradient. That's sufficient.

Now we need to implement animations:

- Stars twinkling: each star circle will have `<animate attributeName="opacity" values="0;1;0" dur="2s" repeatCount="indefinite"/>`. We can offset each star's begin time using `begin` attribute: e.g., `<animate attributeName="opacity" ... begin="0s"/>` for first star, etc. But we can simply have each star have its own animation with random begin times, but we can manually set for each star a slight offset.

Simplify: For each star, we can set `style="animation: twink 2s infinite;"` but that's CSS. We can use `<animate>` with `begin` attribute set to e.g., "0.5s", "1s", etc. We'll need to manually specify for each star.

But we can also use CSS animation inside `<style>` with `@keyframes` and set animation-delay for each star class. However, using SMIL is fine.

Given we need to ensure there are many stars (maybe 30-40). Manually writing each star with unique begin values might be tedious, but doable.

Alternatively, we can create a star group that uses `<animate>` with `begin="i*0.2s"`? But SMIL doesn't support expression for begin. However, we can use `<animate>` with `begin="0s"` for all stars, which would cause them to all twinkle synchronously. That might be less natural. But it's okay; the requirement doesn't require random twinkling, just "stars twinkling". They can twinkle in sync.

Thus we could have all stars twinkle synchronously, which is okay. It will produce a twinkling effect across the sky. It's simpler.

Thus for each star, we can just have `<animate attributeName="opacity" values="0;1;0" dur="2s" repeatCount="indefinite"/>` without begin offset.

Thus all stars will blink together. That's acceptable.

Now the tail swaying: we need to add `<animateTransform>` to the tailGroup. That should be set with `dur="2s"` repeat indefinite. Possibly `additive="sum"`? Actually we want rotation values. So we can set:

`<animateTransform attributeName="transform" type="rotate" values="0 0 0; -15 0 0; 15 0 0; 0 0 0" dur="2s" repeatCount="indefinite"/>`

Now shooting star: we need a group `<g id="shootingStarGroup" transform="translate(800,200)">` containing a line and a triangle. Then we need an animation on that group: `<animateTransform attributeName="transform" type="translate" values="0,0; -900,0; 0,0" dur="4s" begin="2s" repeatCount="indefinite"/>`. Actually we want the group to start off screen right (translate x=800) and move left across to off screen left. We can set transform="translate(800,200)" initially, then animate to translate(-200,200). So we can set `values="800,200 -200,200"`.

Thus:

```xml
<g id="shootingStarGroup" transform="translate(800,200)">
   <line x1="0" y1="0" x2="-40" y2="0" stroke="white" stroke-width="2"/>
   <path d="M0,0 L-12,-7 L-12,7 Z" fill="white"/>
   <animateTransform attributeName="transform" type="translate" values="800,200 -200,200" dur="4s" begin="2s" repeatCount="indefinite"/>
</g>
```

This will cause the shooting star to appear at 2 seconds, then travel left across the view, and after finishing, it will be off-screen left. Then the animation will repeat, causing new shooting stars every 4 seconds. The requirement says "shooting star crossing the sky every 4 seconds (the first one within 2 seconds)". So we set begin="2s" and dur="4s" repeat indefinite. That satisfies: first at 2 seconds, then every 4 seconds (so next at 6 seconds, etc). However, after each iteration, it will repeat with the same begin? Actually if we set repeatCount="indefinite" and dur="4s", the animation will repeat continuously, resetting each iteration. The first iteration starts at 2s, then repeats every 4 seconds. So it matches.

Now we need to ensure that the shooting star is visible against the night sky. It's white, good.

Now we need to include a gradient somewhere. We already have sky gradient and moon gradient. That counts.

Now we need to ensure the SVG is valid and self-contained. We'll need to use proper xmlns and viewBox.

We also need to ensure that the SVG file is exactly one code block: nothing else before or after.

Now we need to produce the code.

Given the complexity of generating many stars manually, we need to embed maybe ~40 stars. We can manually place them using coordinates in the sky region (y from 0 to maybe 300). We'll need to calculate approximate positions.

We can place stars roughly across the sky: from x=50 to x=750, y from 80 to 300. We'll generate maybe 40 stars, random-ish positions. But we need to ensure no errors in the SVG. We'll manually write them.

We can also group the stars in `<g>` to apply animation to each individually. But we can also create each star element individually.

Given we have many stars, we need to ensure the code is not overly long, but it's okay.

Given the constraints, we need to keep the file manageable but still meet requirements.

Now let's craft the full SVG.

We'll structure the SVG as:

```svg
<svg xmlns="http://www.w3.org/2000/svg" viewBox="0 0 800 600">
  <defs>
    ... gradients and filters ...
  </defs>

  <!-- sky background -->
  <rect x="0" y="0" width="800" height="600" fill="url(#skyGradient)"/>

  <!-- stars -->
  <circle cx="50" cy="100" r="2" fill="white">
    <animate attributeName="opacity" values="0;1;0" dur="2s" repeatCount="indefinite"/>
  </circle>
  <circle cx="120" cy="150" r="3" fill="white">
    <animate attributeName="opacity" values="0;1;0" dur="2s" repeatCount="indefinite"/>
  </circle>
  ... many more ...

  <!-- distant hills -->
  <path d="M0,600 C200,450 400,500 600,350 L600,600 Z" fill="#3a3f4b"/>
  <path d="M600,600 C800,460 900,520 800,350 L800,600 Z" fill="#3e434c"/>

  <!-- near hill -->
  <path d="M400,600 C550,460 650,500 750,350 L750,600 Z" fill="#454b5a"/>

  <!-- trees -->
  <!-- Tree 1 -->
  <g id="tree1">
    <rect x="150" y="520" width="10" height="40" fill="#5a4025"/>
    <circle cx="150" cy="460" r="30" fill="#2e7d32"/>
    <circle cx="110" cy="440" r="20" fill="#2e7d32"/>
    <circle cx="190" cy="440" r="20" fill="#2e7d32"/>
  </g>

  <!-- Tree 2 -->
  <g id="tree2">
    <rect x="620" y="540" width="10" height="40" fill="#5a4025"/>
    <circle cx="620" cy="480" r="30" fill="#2e7d32"/>
    <circle cx="580" cy="460" r="20" fill="#2e7d32"/>
    <circle cx="660" cy="460" r="20" fill="#2e7d32"/>
  </g>

  <!-- Tree 3 (distant left) -->
  <g id="tree3">
    <rect x="200" y="560" width="8" height="30" fill="#5a4025"/>
    <circle cx="200" cy="500" r="25" fill="#2e7d32"/>
    <circle cx="170" cy="480" r="16" fill="#2e7d32"/>
    <circle cx="230" cy="480" r="16" fill="#2e7d32"/>
  </g>

  <!-- Tree 4 (distant right) -->
  <g id="tree4">
    <rect x="700" y="560" width="8" height="30" fill="#5a4025"/>
    <circle cx="700" cy="500" r="25" fill="#2e7d32"/>
    <circle cx="670" cy="480" r="16" fill="#2e7d32"/>
    <circle cx="730" cy="480" r="16" fill="#2e7d32"/>
  </g>

  <!-- Fox legs (optional) -->
  <!-- Front left leg -->
  <rect x="560" y="410" width="20" height="30" fill="#a05d2c"/>
  <!-- Front right leg -->
  <rect x="680" y="410" width="20" height="30" fill="#a05d2c"/>
  <!-- Back left leg -->
  <rect x="540" y="440" width="30" height="35" fill="#a05d2c"/>
  <!-- Back right leg -->
  <rect x="690" y="440" width="30" height="35" fill="#a05d2c"/>

  <!-- Fox tail group (behind body) -->
  <g id="tailGroup" transform="translate(680,380)">
    <path id="tailMain" d="M0,0 C40,-80 80,-120 100,-120 A30,30 0 0 1 120,-120 Z" fill="#c77136"/>
    <path id="tailTip" d="M120,-120 L150,-120 L135,-140 Z" fill="#ffffff"/>
    <animateTransform attributeName="transform" type="rotate" values="0 0 0; -15 0 0; 15 0 0; 0 0 0" dur="2s" repeatCount="indefinite"/>
  </g>

  <!-- Fox body -->
  <ellipse cx="620" cy="380" rx="80" ry="50" fill="#c77136" stroke="#a05d2c" stroke-width="2"/>

  <!-- Fox ears -->
  <polygon points="540,330 520,300 560,300" fill="#c77136"/>
  <polygon points="700,330 720,300 680,300" fill="#c77136"/>

  <!-- Fox snout -->
  <polygon points="580,380 660,380 620,440" fill="#3e2c1d"/>

  <!-- Moon with glow -->
  <defs>
    <filter id="moonGlow">
      <feGaussianBlur stdDeviation="4" result="blur"/>
      <feMerge>
        <feMergeNode in="blur"/>
        <feMergeNode in="SourceGraphic"/>
      </feMerge>
    </filter>
  </defs>
  <circle cx="680" cy="80" r="70" fill="url(#moonGradient)" filter="url(#moonGlow)"/>

  <!-- Shooting star -->
  <g id="shootingStarGroup" transform="translate(800,200)">
    <line x1="0" y1="0" x2="-40" y2="0" stroke="white" stroke-width="2"/>
    <path d="M0,0 L-12,-7 L-12,7 Z" fill="white"/>
    <animateTransform attributeName="transform" type="translate" values="800,200 -200,200" dur="4s" begin="2s" repeatCount="indefinite"/>
  </g>
</svg>
```

We need to ensure all elements are closed properly, no stray tags. We need to ensure we didn't use any JavaScript. We used only SVG elements, CSS? Not needed. We used SMIL animations.

Now we need to fill in the star elements. Let's generate maybe 30 star circles. We'll manually place them.

We'll need to close each `<circle>` with `<animate>` inside.

Let's plan star coordinates:

We'll place stars at various x,y positions across the sky. We'll use small radii: r="1" or r="2". We'll use fill="white". We'll add `<animate attributeName="opacity" values="0;1;0" dur="2s" repeatCount="indefinite"/>`.

We'll also optionally set `begin` attribute with offset? Not needed.

We should ensure there are many stars, maybe around 30-40, but we can include about 25.

Let's generate a list of star coordinates manually.

We'll create a star at:

1. (50, 100) r=2
2. (120, 150) r=3
3. (200, 120) r=2
4. (280, 180) r=1
5. (350, 90) r=2
6. (420, 200) r=2
7. (500, 130) r=3
8. (560, 80) r=2
9. (620, 150) r=2
10. (700, 110) r=2
11. (770, 180) r=1
12. (80, 250) r=2
13. (150, 300) r=3
14. (220, 280) r=2
15. (300, 340) r=1
16. (380, 320) r=2
17. (460, 260) r=2
18. (540, 210) r=3
19. (620, 260) r=2
20. (700, 240) r=2
21. (780, 300) r=2
22. (100, 400) r=2
23. (180, 420) r=3
24. (260, 380) r=2
25. (340, 430) r=1
26. (420, 380) r=2
27. (500, 440) r=2
28. (580, 420) r=3
29. (660, 380) r=2
30. (740, 410) r=2
31. (800, 340) r=1 (just at edge)
32. (720, 260) r=2
33. (640, 210) r=2
34. (560, 170) r=3
35. (480, 150) r=2
36. (360, 120) r=2
37. (260, 100) r=1
38. (140, 80) r=2
39. (80, 60) r=2
40. (300, 60) r=3

We can decide to include a subset. At least "many stars" – 30-40 is fine.

Now we need to ensure that stars are drawn early (before hills) to be behind them. In our order, we placed stars after sky fill, before hills. That's good.

Now we need to ensure that the fox's tail group is placed after the legs but before the body. We placed tail group after legs but before body; that's good.

Now we need to ensure that the moon's filter is defined before the moon element. The filter definitions are inside `<defs>` at top. In our snippet, we defined the filter earlier; but we have `<defs>` containing gradients only; later we also defined `<defs>` again for the moon filter. Actually we need to have all defs in one `<defs>` block. We can combine all definitions inside a single `<defs>` at top.

We'll modify: Inside `<defs>` we define gradients #skyGradient, #moonGradient, #moonGlow filter, and maybe other filters. So we move everything there.

Thus at top:

```xml
<defs>
  <linearGradient id="skyGradient" x1="0%" y1="0%" x2="0%" y2="100%">
    <stop offset="0%" stop-color="#0b0e14"/>
    <stop offset="100%" stop-color="#1a1f2c"/>
  </linearGradient>
  <radialGradient id="moonGradient" cx="50%" cy="50%" r="50%" fx="50%" fy="50%">
    <stop offset="0%" stop-color="#fff"/>
    <stop offset="100%" stop-color="#5a6475"/>
  </radialGradient>
  <filter id="moonGlow">
    <feGaussianBlur stdDeviation="4" result="blur"/>
    <feMerge>
      <feMergeNode in="blur"/>
      <feMergeNode in="SourceGraphic"/>
    </feMerge>
  </filter>
</defs>
```

Now the moon element can refer to these.

Now we need to ensure that the moon is placed after the fox and hills, but before the shooting star? Actually shooting star should be on top of everything, but it's moving across the sky, likely above hills and fox. So we place shooting star after moon. However, the moon and shooting star should be behind? The shooting star moves across the sky, but the moon is static; we could place the moon first then the shooting star on top. Or we could place shooting star before moon and let moon be on top. It doesn't matter much.

Given we want the shooting star to be visible across the sky, we might want it behind the moon? The moon is bright, the shooting star is white, can be seen in front of the moon. Usually a shooting star appears in front of the moon. So we could place shooting star after the moon.

Thus order: sky fill, stars, hills, trees, fox components, moon, shooting star.

Now we need to ensure the fox's ears and snout are on top of the body. The body ellipse might obscure them if placed after. We placed body before ears and snout? In our order, we placed body after tail group but before ears? Actually we placed body after tail group but before ears? In the earlier snippet we had:

- tail group
- body ellipse
- ears
- snout

Thus ears and snout are drawn after the body, so they appear on top of the body (covering it partially). That is fine.

Now check the positions: The fox's ears points: For left ear, points "540,330 520,300 560,300". This ear may be placed near the left side of the fox's head. The fox's body center is at (620,380). The ears are placed at around x=540-560 and x=680-700, which are roughly left and right of the head. That seems plausible.

The snout: points "580,380 660,380 620,440". This snout extends below the body. The snout may intersect the body ellipse; it's fine, as it's drawn after.

Now the tail group: The tail base is at (680,380). The tail shape extends upward (negative y) and outward right. This seems okay.

Now the fox's legs: we placed front left leg at (560,410) width=20 height=30. This is roughly left front leg area. Front right leg at (680,410) width=20 height=30. Back left leg at (540,440) width=30 height=35. Back right leg at (690,440) width=30 height=35. Those positions may overlap with body ellipse (which extends to x=620 +/- 80). The legs may be partially covered by the body, but that's okay.

Now the trees: placed at (150,520) etc. They are fine.

Now we need to ensure that all elements have proper close tags and no stray spaces.

Now about star twinkling animation: We'll add `<animate attributeName="opacity" values="0;1;0" dur="2s" repeatCount="indefinite"/>` inside each `<circle>`.

Now we need to check the viewBox: 0 0 800 600. All coordinates are within that.

Now ensure no use of external references: everything is inline.

Now ensure no JavaScript: Yes.

Now ensure the page looks right in a 1280×800 viewport and adapts down to 375px. Since we are using viewBox and not fixed width/height, the SVG will scale accordingly. However, we didn't set width/height attributes on `<svg>`. Usually default width/height is 100% if not specified. It will scale. But we may want to set width="100%" height="100%" or just leave it. The requirement: "The page must look right in a 1280×800 viewport and adapt gracefully down to 375px wide. No horizontal scrollbar." As we are just generating an SVG, the viewport is determined by the containing iframe. The SVG itself has viewBox 0 0 800 600; if we set width and height to 100% (or maybe we don't need to set). Usually browsers will default to intrinsic dimensions: width="800" height="600"? Actually the default width/height attribute is not set; the SVG will use its viewBox to calculate aspect ratio and then scale to fit containing block (if width/height not set, default is "auto"). According to SVG spec, if width/height are not provided, the SVG will size itself to 100% of viewport, preserving aspect ratio with viewBox. So it should adapt.

Now ensure something is visible on first paint: the sky fill, stars, hills, fox will be visible. Yes.

Now we need to produce the output as a single fenced code block with language "svg". Must be exactly one block, with no extra text before or after.

Thus final answer: just the code block.

Now let's write the final SVG with all elements correctly nested.

We'll need to write the code carefully.

We'll produce the final SVG code.

Let's assemble.

We'll start:

```svg
<svg xmlns="http://www.w3.org/2000/svg" viewBox="0 0 800 600">
  <defs>
    <linearGradient id="skyGradient" x1="0%" y1="0%" x2="0%" y2="100%">
      <stop offset="0%" stop-color="#0b0e14"/>
      <stop offset="100%" stop-color="#1a1f2c"/>
    </linearGradient>
    <radialGradient id="moonGradient" cx="50%" cy="50%" r="50%" fx="50%" fy="50%">
      <stop offset="0%" stop-color="#fff"/>
      <stop offset="100%" stop-color="#5a6475"/>
    </radialGradient>
    <filter id="moonGlow">
      <feGaussianBlur stdDeviation="4" result="blur"/>
      <feMerge>
        <feMergeNode in="blur"/>
        <feMergeNode in="SourceGraphic"/>
      </feMerge>
    </filter>
  </defs>

  <!-- Sky background -->
  <rect x="0" y="0" width="800" height="600" fill="url(#skyGradient)"/>

  <!-- Stars with twinkling -->
  <circle cx="50" cy="100" r="2" fill="white">
    <animate attributeName="opacity" values="0;1;0" dur="2s" repeatCount="indefinite"/>
  </circle>
  <circle cx="120" cy="150" r="3" fill="white">
    <animate attributeName="opacity" values="0;1;0" dur="2s" repeatCount="indefinite"/>
  </circle>
  <circle cx="200" cy="120" r="2" fill="white">
    <animate attributeName="opacity" values="0;1;0" dur="2s" repeatCount="indefinite"/>
  </circle>
  <circle cx="280" cy="180" r="1" fill="white">
    <animate attributeName="opacity" values="0;1;0" dur="2s" repeatCount="indefinite"/>
  </circle>
  <circle cx="350" cy="90" r="2" fill="white">
    <animate attributeName="opacity" values="0;1;0" dur="2s" repeatCount="indefinite"/>
  </circle>
  <circle cx="420" cy="200" r="2" fill="white">
    <animate attributeName="opacity" values="0;1;0" dur="2s" repeatCount="indefinite"/>
  </circle>
  <circle cx="500" cy="130" r="3" fill="white">
    <animate attributeName="opacity" values="0;1;0" dur="2s" repeatCount="indefinite"/>
  </circle>
  <circle cx="560" cy="80" r="2" fill="white">
    <animate attributeName="opacity" values="0;1;0" dur="2s" repeatCount="indefinite"/>
  </circle>
  <circle cx="620" cy="150" r="2" fill="white">
    <animate attributeName="opacity" values="0;1;0" dur="2s" repeatCount="indefinite"/>
  </circle>
  <circle cx="700" cy="110" r="2" fill="white">
    <animate attributeName="opacity" values="0;1;0" dur="2s" repeatCount="indefinite"/>
  </circle>
  <circle cx="770" cy="180" r="1" fill="white">
    <animate attributeName="opacity" values="0;1;0" dur="2s" repeatCount="indefinite"/>
  </circle>
  <circle cx="80" cy="250" r="2" fill="white">
    <animate attributeName="opacity" values="0;1;0" dur="2s" repeatCount="indefinite"/>
  </circle>
  <circle cx="150" cy="300" r="3" fill="white">
    <animate attributeName="opacity" values="0;1;0" dur="2s" repeatCount="indefinite"/>
  </circle>
  <circle cx="220" cy="280" r="2" fill="white">
    <animate attributeName="opacity" values="0;1;0" dur="2s" repeatCount="indefinite"/>
  </circle>
  <circle cx="300" cy="340" r="1" fill="white">
    <animate attributeName="opacity" values="0;1;0" dur="2s" repeatCount="indefinite"/>
  </circle>
  <circle cx="380" cy="320" r="2" fill="white">
    <animate attributeName="opacity" values="0;1;0" dur="2s" repeatCount="indefinite"/>
  </circle>
  <circle cx="460" cy="260" r="2" fill="white">
    <animate attributeName="opacity" values="0;1;0" dur="2s" repeatCount="indefinite"/>
  </circle>
  <circle cx="540" cy="210" r="3" fill="white">
    <animate attributeName="opacity" values="0;1;0" dur="2s" repeatCount="indefinite"/>
  </circle>
  <circle cx="620" cy="260" r="2" fill="white">
    <animate attributeName="opacity" values="0;1;0" dur="2s" repeatCount="indefinite"/>
  </circle>
  <circle cx="700" cy="240" r="2" fill="white">
    <animate attributeName="opacity" values="0;1;0" dur="2s" repeatCount="indefinite"/>
  </circle>
  <circle cx="780" cy="300" r="2" fill="white">
    <animate attributeName="opacity" values="0;1;0" dur="2s" repeatCount="indefinite"/>
  </circle>
  <circle cx="100" cy="400" r="2" fill="white">
    <animate attributeName="opacity" values="0;1;0" dur="2s" repeatCount="indefinite"/>
  </circle>
  <circle cx="180" cy="420" r="3" fill="white">
    <animate attributeName="opacity" values="0;1;0" dur="2s" repeatCount="indefinite"/>
  </circle>
  <circle cx="260" cy="380" r="2" fill="white">
    <animate attributeName="opacity" values="0;1;0" dur="2s" repeatCount="indefinite"/>
  </circle>
  <circle cx="340" cy="430" r="1" fill="white">
    <animate attributeName="opacity" values="0;1;0" dur="2s" repeatCount="indefinite"/>
  </circle>
  <circle cx="420" cy="380" r="2" fill="white">
    <animate attributeName="opacity" values="0;1;0" dur="2s" repeatCount="indefinite"/>
  </circle>
  <circle cx="500" cy="440" r="2" fill="white">
    <animate attributeName="opacity" values="0;1;0" dur="2s" repeatCount="indefinite"/>
  </circle>
  <circle cx="580" cy="420" r="3" fill="white">
    <animate attributeName="opacity" values="0;1;0" dur="2s" repeatCount="indefinite"/>
  </circle>
  <circle cx="660" cy="380" r="2" fill="white">
    <animate attributeName="opacity" values="0;1;0" dur="2s" repeatCount="indefinite"/>
  </circle>
  <circle cx="740" cy="410" r="2" fill="white">
    <animate attributeName="opacity" values="0;1;0" dur="2s" repeatCount="indefinite"/>
  </circle>
  <circle cx="800" cy="340" r="1" fill="white">
    <animate attributeName="opacity" values="0;1;0" dur="2s" repeatCount="indefinite"/>
  </circle>
  <circle cx="720" cy="260" r="2" fill="white">
    <animate attributeName="opacity" values="0;1;0" dur="2s" repeatCount="indefinite"/>
  </circle>
  <circle cx="640" cy="210" r="2" fill="white">
    <animate attributeName="opacity" values="0;1;0" dur="2s" repeatCount="indefinite"/>
  </circle>
  <circle cx="560" cy="170" r="3" fill="white">
    <animate attributeName="opacity" values="0;1;0" dur="2s" repeatCount="indefinite"/>
  </circle>
  <circle cx="480" cy="150" r="2" fill="white">
    <animate attributeName="opacity" values="0;1;0" dur="2s" repeatCount="indefinite"/>
  </circle>
  <circle cx="360" cy="120" r="2" fill="white">
    <animate attributeName="opacity" values="0;1;0" dur="2s" repeatCount="indefinite"/>
  </circle>
  <circle cx="260" cy="100" r="1" fill="white">
    <animate attributeName="opacity" values="0;1;0" dur="2s" repeatCount="indefinite"/>
  </circle>
  <circle cx="140" cy="80" r="2" fill="white">
    <animate attributeName="opacity" values="0;1;0" dur="2s" repeatCount="ind + "..."? Actually we need to ensure the code is syntactically correct. We'll need to ensure that we don't have any stray unclosed tags.

We'll need to produce the entire SVG correctly.

Now we need to ensure the order and proper closing tags.

We'll also ensure we include necessary namespace for SMIL animations. The `<animate>` and `<animateTransform>` are part of SVG 1.1 and need no extra namespace.

Now we should double-check the tail group's animation syntax: `<animateTransform attributeName="transform" type="rotate" values="0 0 0; -15 0 0; 15 0 0; 0 0 0" dur="2s" repeatCount="indefinite"/>`. Yes.

Now the shooting star animation: `<animateTransform attributeName="transform" type="translate" values="800,200 -200,200" dur="4s" begin="2s" repeatCount="indefinite"/>`. Yes.

Now the tail group: we need to ensure the path definitions are correct. Let's verify the path for tailMain: "M0,0 C40,-80 80,-120 100,-120 A30,30 0 0 1 120,-120 Z". This is valid: after the arc, we close path.

We need to ensure there is no missing comma in the animateTransform values: "0 0 0; -15 0 0; 15 0 0; 0 0 0". That is fine.

Now for the shooting star group: transform "translate(800,200)" sets its initial position. Then the animateTransform changes its transform attribute. However, note that animateTransform modifies the transform attribute, but if we have both a static transform and an animated transform on the same element, they can conflict. In SVG, you can apply animation to an attribute, but if there is also a transform attribute on the element, the animation will modify it. Usually you can either have the animation replace the static transform, or you can have the animation be separate. The proper way is to use `<animateTransform>` on the group without a static transform, and set initial position using attribute values? Actually you can set `<animateTransform>` with `from` and `to`. But we can also use `attributeName="transform"` and `type="translate"` with `values`. However, the group already has a `transform="translate(800,200)"`. The animateTransform will add another animation that modifies transform, but may cause duplication. In SMIL, you can apply animation to transform attribute even if there is a static transform. The static transform is the initial value; the animation will apply additional changes. According to spec, the animation will replace the static transform after start? I think it's okay: The static transform defines the initial state, and the animation defines subsequent changes. So it's fine.

Alternatively, we could remove the static transform and use `begin` to set initial position? But we need the shooting star to start off-screen right. Using static transform is okay.

Now we need to check that there are no stray `<` inside attribute values. All good.

Now we should verify that the code has no syntax errors. Let's go through the code and check.

We'll produce the final SVG code now.

One more check: The `<filter>` element is inside `<defs>`; we need to close it properly: `<filter id="moonGlow">` opens, then `<feGaussianBlur .../>` and `<feMerge>` open, then `<feMergeNode .../>`, `<feMergeNode .../>`, then `</feMerge>`, then `</filter>`.

Now the moon circle: `<circle cx="680" cy="80" r="70" fill="url(#moonGradient)" filter="url(#moonGlow)"/>`. That's correct.

Now the fox ears and snout: polygons need correct points. They appear fine.

Now tail group: `<g id="tailGroup" transform="translate(680,380)">` opens group. Inside we have two `<path>` elements and `<animateTransform>`. The group ends with `</g>`.

Now after tail group we have `<ellipse .../>` for fox body. Then `<polygon .../>` for ears. Then `<polygon .../>` for snout.

Now we need to ensure that the order of elements doesn't cause any unexpected overlaps causing some parts to be hidden behind others. That is okay.

Now check the font of the fox tail: the tailMain path uses "A30,30 0 0 1 120,-120". That arc has parameters: rx=30, ry=30, x-axis-rotation=0, large-arc-flag=0, sweep-flag=1, endpoint (120,-120). Since the current point is (100,-120) (the end of the C curve) and the endpoint is (120,-120). The arc will draw a quarter circle of radius 30, from (100,-120) to (120,-120). Actually the current point is (100,-120) after the C curve. Then the arc draws a 90-degree arc to (120,-120). That will produce a rounded tip. Then we close the path with Z, which will connect back to the start (0,0) through a straight line? Actually the Z will close the shape to (0,0). So the shape is a C shape plus a rounded tip. Good.

Tail tip: a triangle shape from (120,-120) to (150,-120) to (135,-140). That extends beyond the main tail.

Now tail group animation: rotates around (0,0) (relative origin). Actually `<animateTransform ... values="0 0 0; -15 0 0; 15 0 0; 0 0 0"`. The values are three numbers: angle, cx, cy. So -15 0 0 rotates -15 degrees about (0,0). That means rotate about the group's origin (which is at (0,0) relative to the group). But the group's origin is set via `transform="translate(680,380)"`. Actually the rotate animation is relative to the group's origin after translation? The group has transform="translate(680,380)". The rotate animation modifies the transform attribute (which currently is a translate). According to SMIL, the transform attribute can hold multiple transforms (like translate and rotate). The animation will add a rotate around the origin after translation? It may produce combined transforms. It may be okay. However, perhaps we need to reset the group transform to identity before rotate, then animate. Usually you would set `<g>` without transform, and use `<animateTransform>` with attributeName="transform" and values for rotation, and you can also have a static translate? There's a known approach: Use `<animateTransform>` with `type="rotate"` and include the translate as part of the values. For example, values="0 680 380; -15 680 380; 15 680 380; 0 680 380". This rotates around the base point (680,380). So we could set group without transform, then animate rotate. But we have group transform="translate(680,380)" to move group to position. Then we also animate rotate. The rotation will be about (0,0) if we specify values "0 0 0". But we can also specify rotation about (0,0) as group origin? Actually the animateTransform values specify angle and rotation point coordinates. In our case, we want tail to rotate about its base point (the point where tail attaches to fox). The tail group is positioned at (680,380) via translate. So we might want to rotate about that point, not about (0,0). So we should set the animateTransform values to rotate about (680,380). But our group is already at (680,380), so the rotation about (0,0) would rotate the tail around the origin of the group (i.e., around the base point?), no, if the group has transform "translate(680,380)", then the group is positioned relative to the parent coordinate system. The group's own local coordinate system has origin at (0,0) relative to the group, which corresponds to (680,380) in absolute coordinates. So rotating about (0,0) within the group (the rotation point expressed in the current user coordinate system of the group) will rotate around that origin, i.e., around the base point. Actually the values for rotate in animateTransform are "angle cx cy", expressed in the current user coordinate system of the element. Since the element's transform is translate, the user coordinate system is shifted. So rotation about (0,0) would be about the origin of the group's coordinate system which is located at (680,380) absolute. So that is what we want. So it's okay.

Thus the tail swaying animation is fine.

Now we need to ensure there are no duplicate `<defs>` sections. Right now we have `<defs>` with gradients and filter. Then later we have another `<defs>` for the moon filter? Actually we defined filter inside the first `<defs>`. So we need to not duplicate `<defs>` later. We placed filter inside the same defs at top.

Later we referenced `<filter id="moonGlow">` which is defined inside the first `<defs>`.

Thus we should not have a separate `<defs>` later. So we need to remove any later `<defs>` declarations.

In our earlier plan, we had:

```
<defs>
   ... gradients and filter ...
</defs>
...
<!-- Moon with glow -->
<defs>
   <filter id="moonGlow">...
</defs>
<circle ... filter="url(#moonGlow)"/>
```

That duplicates `<defs>` tags. We need to combine them. So we should have a single `<defs>` at top, containing all needed definitions.

Thus we will adjust the SVG accordingly: define everything inside one `<defs>`.

Now we need to ensure that the filter is referenced correctly: `<circle ... filter="url(#..."/>`.

Now the tail group animation: we need to ensure the animateTransform's values attribute is correct.

Now we need to ensure that the shooting star group has the line and triangle correctly positioned. The line goes from (0,0) to (-40,0). The triangle has points M0,0 L-12,-7 L-12,7 Z. That's fine.

Now we need to check that the shooting star's animation does not cause a conflict with the static transform. This is fine.

Now we need to ensure that there is no stray whitespace or unclosed tags.

Now we need to produce the final SVG.

Now we need to double-check the ordering of items. Let's produce the final SVG with proper ordering.

We'll produce the final SVG code in a single code block.

Will we need to escape quotes inside attribute values? Not necessary.

Now we need to ensure the code doesn't have any errors.

Let's manually write the final SVG with all elements.

We'll produce the SVG:

```svg
<svg xmlns="http للن.jsdelivr.net/npm/@babel/standalone ..."? No, just xmlns.

<svg xmlns="http://www.w3.org/2000/svg" viewBox="0 0 800 600">
  <defs>
    <linearGradient id="skyGradient" x1="0%" y1="0%" x2="0%" y2="100%">
      <stop offset="0%" stop-color="#0b0e14"/>
      <stop offset="100%" stop-color="#1a1f2c"/>
    </linearGradient>
    <radialGradient id="moonGradient" cx="50%" cy="50%" r="50%" fx="50%" fy="50%">
      <stop offset="0%" stop-color="#fff"/>
      <stop offset="100%" stop-color="#5a6475"/>
    </radialGradient>
    <filter id="moonGlow">
      <feGaussianBlur stdDeviation="4" result="blur"/>
      <feMerge>
        <feMergeNode in="blur"/>
        <feMergeNode in="SourceGraphic"/>
      </feMerge>
    </filter>
  </defs>

  <!-- Sky background -->
  <rect x="0" y="0" width="800" height="600" fill="url(#skyGradient)"/>

  <!-- Stars with twinkling -->
  <circle cx="50" cy="100" r="2" fill="white">
    <animate attributeName="opacity" values="0;1;0" dur="2s" repeatCount="indefinite"/>
  </circle>
  <circle cx="120" cy="150" r="3" fill="white">
    <animate attributeName="opacity" values="0;1;0" dur="2s" repeatCount="indefinite"/>
  </circle>
  <circle cx="200" cy="120" r="2" fill="white">
    <animate attributeName="opacity" values="0;1;0" dur="2s" repeatCount="indefinite"/>
  </circle>
  <circle cx="280" cy="180" r="1" fill="white">
    <animate attributeName="opacity" values="0;1;0" dur="2s" repeatCount="indefinite"/>
  </circle>
  <circle cx="350" cy="90" r="2" fill="white">
    <animate attributeName="opacity" values="0;1;0" dur="2s" repeatCount="indefinite"/>
  </circle>
  <circle cx="420" cy="200" r="2" fill="white">
    <animate attributeName="opacity" values="0;1;0" dur="2s" repeatCount="indefinite"/>
  </circle>
  <circle cx="500" cy="130" r="3" fill="white">
    <animate attributeName="opacity" values="0;1;0" dur="2s" repeatCount="indefinite"/>
  </circle>
  <circle cx="560" cy="80" r="2" fill="white">
    <animate attributeName="opacity" values="0;1;0" dur="2s" repeatCount="indefinite"/>
  </circle>
  <circle cx="620" cy="150" r="2" fill="white">
    <animate attributeName="opacity" values="0;1;0" dur="2s" repeatCount="indefinite"/>
  </circle>
  <circle cx="700" cy="110" r="2" fill="white">
    <animate attributeName="opacity" values="0;1;0" dur="2s" repeatCount="indefinite"/>
  </circle>
  <circle cx="770" cy="180" r="1" fill="white">
    <animate attributeName="opacity" values="0;1;0" dur="2s" repeatCount="indefinite"/>
  </circle>
  <circle cx="80" cy="250" r="2" fill="white">
    <animate attributeName="opacity" values="0;1;0" dur="2s" repeatCount="indefinite"/>
  </circle>
  <circle cx="150" cy="300" r="3" fill="white">
    <animate attributeName="opacity" values="0;1;0" dur="2s" repeatCount="indefinite"/>
  </circle>
  <circle cx="220" cy="280" r="2" fill="white">
    <animate attributeName="opacity" values="0;1;0" dur="2s" repeatCount="indefinite"/>
  </circle>
  <circle cx="300" cy="340" r="1" fill="white">
    <animate attributeName="opacity" values="0;1;0" dur="2s" repeatCount="indefinite"/>
  </circle>
  <circle cx="380" cy="320" r="2" fill="white">
    <animate attributeName="opacity" values="0;1;0" dur="2s" repeatCount="indefinite"/>
  </circle>
  <circle cx="460" cy="260" r="2" fill="white">
    <animate attributeName="opacity" values="0;1;0" dur="2s" repeatCount="indefinite"/>
  </circle>
  <circle cx="540" cy="210" r="3" fill="white">
    <animate attributeName="opacity" values="0;1;0" dur="2s" repeatCount="indefinite"/>
  </circle>
  <circle cx="620" cy="260" r="2" fill="white">
    <animate attributeName="opacity" values="0;1;0" dur="2s" repeatCount="indefinite"/>
  </circle>
  <circle cx="700" cy="240" r="2" fill="white">
    <animate attributeName="opacity" values="0;1;0" dur="2s" repeatCount="indefinite"/>
  </circle>
  <circle cx="780" cy="300" r="2" fill="white">
    <animate attributeName="opacity" values="0;1;0" dur="2s" repeatCount="indefinite"/>
  </circle>
  <circle cx="100" cy="400" r="2" fill="white">
    <animate attributeName="opacity" values="0;1;0" dur="2s" repeatCount="indefinite"/>
  </circle>
  <circle cx="180" cy="420" r="3" fill="white">
    <animate attributeName="opacity" values="0;1;0" dur="2s" repeatCount="indefinite"/>
  </circle>
  <circle cx="260" cy="380" r="2" fill="white">
    <animate attributeName="opacity" values="0;1;0" dur="2s" repeatCount="indefinite"/>
  </circle>
  <circle cx="340" cy="430" r="1" fill="white">
    <animate attributeName="opacity" values="0;1;0" dur="2s" repeatCount="indefinite"/>
  </circle>
  <circle cx="420" cy="380" r="2" fill="white">
    <animate attributeName="opacity" values="0;1;0" dur="2s" repeatCount="indefinite"/>
  </circle>
  <circle cx="500" cy="440" r="2" fill="white">
    <animate attributeName="opacity" values="0;1;0" dur="2s" repeatCount="indefinite"/>
  </circle>
  <circle cx="580" cy="420" r="3" fill="white">
    <animate attributeName="opacity" values="0;1;0" dur="2s" repeatCount="indefinite"/>
  </circle>
  <circle cx="660" cy="380" r="2" fill="white">
    <animate attributeName="opacity" values="0;1;0" dur="2s" repeatCount="indefinite"/>
  </circle>
  <circle cx="740" cy="410" r="2" fill="white">
    <animate attributeName="opacity" values="0;1;0" dur="2s" repeatCount="indefinite"/>
  </circle>
  <circle cx="800" cy="340" r="1" fill="white">
    <animate attributeName="opacity" values="0;1;0" dur="2s" repeatCount="indefinite"/>
  </circle>
  <circle cx="720" cy="260" r="2" fill="white">
    <animate attributeName="opacity" values="0;1;0" dur="2s" repeatCount="indefinite"/>
  </circle>
  <circle cx="640" cy="210" r="2" fill="white">
    <animate attributeName="opacity" values="0;1;0" dur="2s" repeatCount="indefinite"/>
  </circle>
  <circle cx="560" cy="170" r="3" fill="white">
    <animate attributeName="opacity" values="0;1;0" dur="2s" repeatCount="indefinite"/>
  </circle>
  <circle cx="480" cy="150" r="2" fill="white">
    <animate attributeName="opacity" values="0;1;0" dur="2s" repeatCount="indefinite"/>
  </circle>
  <circle cx="360" cy="120" r="2" fill="white">
    <animate attributeName="opacity" values="0;1;0" dur="2s" repeatCount="indefinite"/>
  </circle>
  <circle cx="260" cy="100" r="1" fill="white">
    <animate attributeName="opacity" values="0;1;0" dur="2s" repeatCount="indefinite"/>
  </circle>
  <circle cx="140" cy="80" r="2" fill="white">
    <animate attributeName="opacity" values="0;1;0" dur="2s" repeatCount="indefinite"/>
  </circle>
  <circle cx="80" cy="60" r="2" fill="white">
    <animate attributeName="opacity" values="0;1;0" dur="2s" repeatCount="indefinite"/>
  </circle>
  <circle cx="300" cy="60" r="3" fill="white">
    <animate attributeName="opacity" values="0;1;0" dur="2s" repeatCount="indefinite"/>
  </circle>

  <!-- Distant hills -->
  <path d="M0,600 C200,450 400,500 600,350 L600,600 Z" fill="#3a3f4b"/>
  <path d="M600,600 C800,460 900,520 800,350 L800,600 Z" fill="#3e434c"/>

  <!-- Near hill (where fox sits) -->
  <path d="M400,600 C550,460 650,500 750,350 L750,600 Z" fill="#454b5a"/>

  <!-- Trees -->
  <!-- Tree 1 -->
  <g id="tree1">
    <rect x="150" y="520" width="10" height="40" fill="#5a4025"/>
    <circle cx="150" cy="460" r="30" fill="#2e7d32"/>
    <circle cx="110" cy="440" r="20" fill="#2e7d32"/>
    <circle cx="190" cy="440" r="20" fill="#2e7d32"/>
  </g>

  <!-- Tree 2 -->
  <g id="tree2">
    <rect x="620" y="540" width="10" height="40" fill="#5a4025"/>
    <circle cx="620" cy="480" r="30" fill="#2e7d32"/>
    <circle cx="580" cy="460" r="20" fill="#2e7d32"/>
    <circle cx="660" cy="460" r="20" fill="#2e7d32"/>
  </g>

  <!-- Tree 3 (distant left) -->
  <g id="tree3">
    <rect x="200" y="560" width="8" height="30" fill="#5a4025"/>
    <circle cx="200" cy="500" r="25" fill="#2e7d32"/>
    <circle cx="170" cy="480" r="16" fill="#2e7d32"/>
    <circle cx="230" cy="480" r="16" fill="#2e7d32"/>
  </g>

  <!-- Tree 4 (distant right) -->
  <g id="tree4">
    <rect x="700" y="560" width="8" height="30" fill="#5a4025"/>
    <circle cx="700" cy="500" r="25" fill="#2e7d32"/>
    <circle cx="670" cy="480" r="16" fill="#2e7d32"/>
    <circle cx="730" cy="480" r="16" fill="#2e7d32"/>
  </g>

  <!-- Fox legs (optional) -->
  <rect x="560" y="410" width="20" height="30" fill="#a05d2c"/>
  <rect x="680" y="410" width="20" height="30" fill="#a05d2c"/>
  <rect x="540" y="440" width="30" height="35" fill="#a05d2c"/>
  <rect x="690" y="440" width="30" height="35" fill="#a05d2c"/>

  <!-- Fox tail group -->
  <g id="tailGroup" transform="translate(680,380)">
    <path id="tailMain" d="M0,0 C40,-80 80,-120 100,-120 A30,30 0 0 1 120,-120 Z" fill="#c77136"/>
    <path id="tailTip" d="M120,-120 L150,-120 L135,-140 Z" fill="#ffffff"/>
    <animateTransform attributeName="transform" type="rotate" values="0 0 0; -15 0 0; 15 0 0; 0 0 0" dur="2s" repeatCount="indefinite"/>
  </g>

  <!-- Fox body -->
  <ellipse cx="620" cy="380" rx="80" ry="50" fill="#c77136" stroke="#a05d2c" stroke-width="2"/>

  <!-- Fox ears -->
  <polygon points="540,330 520,300 560,300" fill="#c77136"/>
  <polygon points="700,330 720,300 680,300" fill="#c77136"/>

  <!-- Fox snout -->
  <polygon points="580,380 660,380 620,440" fill="#3e2c1d"/>

  <!-- Moon with glow -->
  <circle cx="680" cy="80" r="70" fill="url(#moonGradient)" filter="url(#moonGlow)"/>

  <!-- Shooting star -->
  <g id="shootingStarGroup" transform="translate(800,200)">
    <line x1="0" y1="0" x2="-40" y2="0" stroke="white" stroke-width="2"/>
    <path d="M0,0 L-12,-7 L-12,7 Z" fill="white"/>
    <animateTransform attributeName="transform" type="translate" values="800,200 -200,200" dur="4s" begin="2s" repeatCount="indefinite"/>
  </g>
</svg>
```

Now we need to verify no stray `<defs>` after we already defined filter. The filter is defined inside `<defs>` at top. So later we should not have another `<defs>`. In the above, after the fox snout, we have "Moon with glow" and we directly have `<circle>` element referencing the filter. No extra `<defs>`.

Now we need to ensure that the `<circle>` for moon uses filter correctly: filter="url(#moonGlow)". The filter is defined in `<defs>`.

Now we need to ensure that there is no stray `<defs>` inside later. There's no.

Now check the `<animate>` inside stars: each `<circle>` has `<animate>` inside. That's fine.

Now check the `<animate>` syntax: attributeName, values, dur, repeatCount are fine.

Now check the `<animateTransform>` for tail group: attributeName="transform", type="rotate", values "0 0 0; -15 0 0; 15 0 0; 0 0 0". In SMIL, values for rotate are "angle cx cy". So "0 0 0" means rotate 0 degrees about point (0,0). That's fine. "-15 0 0" means rotate -15 degrees about (0,0). That's correct. We want rotation about base point of tail group, which is (0,0) relative to group. So fine.

Now check the tailMain path: the command "A30,30 0 0 1 120,-120". In SMIL, the arc command syntax is "A rx ry x-axis-rotation large-arc-flag sweep-flag x y". Here we wrote "A30,30 0 0 1 120,-120". That is correct: rx=30, ry=30, x-axis-rotation=0, large-arc-flag=0, sweep-flag=1, endpoint (120,-120). Good.

Now check tailTip path: "M120,-120 L150,-120 L135,-140 Z". This draws a triangle.

Now check shooting star group: line: `<line x1="0" y1="0" x2="-40" y2="0" stroke="white" stroke-width="2"/>`. Good.

Now check path: `<path d="M0,0 L-12,-7 L-12,7 Z" fill="white"/>`. That's a triangle.

Now check shooting star group transform: `transform="translate(800,200)"`. This places the group at x=800 (off right) and y=200. The animateTransform modifies transform, applying a translation to -200,200. Since both the static transform and the animation modify transform, the initial state is translate(800,200). The animation changes transform to translate(-200,200) and then back to 0? Actually values "800,200 -200,200". So it starts at 800,200 and goes to -200,200. So the star appears off right, moves left across, and ends at -200,200 (off left). The animation repeats, so each iteration starts at 800,200 again. So good.

Now ensure the shooting star group is placed after the moon. In our order, we placed moon before shooting star group. So moon is drawn first, then shooting star group later (so shooting star will appear on top). That's fine.

Now we need to ensure there are no stray `<defs>` after we defined filter. In the above code there is only one `<defs>` at the top.

Now check the `<svg>` closing tag.

Now verify that there is no stray `>`.

Now check that all tags are closed properly.

Now ensure there are no line breaks that could cause text outside the code block. The final answer is a single fenced code block containing the whole SVG. So we need to output exactly:

```svg
<svg ...>
...
</svg>
```

Make sure not to include any extra text before or after the code block. Also ensure that the code block marker is exactly "```svg". Good.

Now we can present the final answer.

One more check: The tail group is placed before the fox body. The fox body may cover the tail base but that's okay. The tail tip will be visible. Good.

Now the fox ears: The ear points: "540,330 520,300 560,300". This is a triangle. It's placed left of the fox. It may intersect with the body, but it's fine.

Now the fox snout: "580,380 660,380 620,440". This is a triangle pointing downwards.

Now the fox legs: the front left leg at (560,410). That's near left front. The front right leg at (680,410). The back left leg at (540,440). Back right leg at (690,440). These might overlap with the tail or body but okay.

Now the tail base at (680,380). The front right leg at (680,410) is vertical above tail base? Actually tail base is at (680,380). The front right leg is at (680,410). That is below tail base? Actually y coordinate: tail base (680,380). front right leg (x=680, y=410) is above tail base (y=380). So leg sits above tail base (maybe overlapping tail). That's fine.

Now the tail sway rotates the group around its origin; the body might cover the base but the tip swings.

Now the fox appears recognizable.

Now we need to ensure there is no horizontal scrollbar. The viewBox width is 800. The SVG may be scaled to fit container, but there's no overflow. Usually setting width/height to 100% will cause scaling but preserve aspect ratio; no horizontal overflow.

Now we also need to check that there are no `<script>` tags, no JavaScript.

Now ensure that all path commands are correct. There's a path for tailMain that uses a cubic Bezier command "C40,-80 80,-120". That's correct. The syntax for C is "C x1,y1 x2,y2 x,y". So we used "C40,-80 80,-120 100,-120". That means control points (40,-80) and (80,-120) and endpoint (100,-120). That's fine.

Now check the tailMain path: "M0,0 C40,-80 80,-120 100,-120 A30,30 0 0 1 120,-120 Z". The C command: after M, we need to provide three sets of coordinates: "C x1,y1 x2,y2 x,y". We gave "C40,-80 80,- koster"? Actually we wrote "C40,-80 80,-120 100,-120". That is correct: first control point (40,-80), second control point (80,-120), final point (100,-120). Good.

Now the arc command: "A30,30 0 0 1 120,-120". That uses rx=30, ry=30, x-axis-rotation=0, large-arc-flag=0, sweep-flag=1, endpoint (120,-120). That's valid.

Now the tailTip path: "M120,-120 L150,-120 L135,-140 Z". That's correct.

Now the shooting star group: the line and path are fine.

Now the stars: The star circles each have `<animate>` inside. That's fine.

Now we need to ensure that all tags are closed, there are no stray spaces.

Now check that there is no `<script>`.

Now check that there is no `<style>` (we don't need CSS). The requirement says "hand-written shapes and paths only: no embedded raster images, no external references, no JavaScript". Using `<style>` is okay? It's not external references. It's okay.

Now also we need to ensure at least one gradient is used. We have sky gradient and moon gradient. So that's satisfied.

Now we need to ensure that the SVG is "standalone" (i interventions). It's fine.

Now we need to ensure that the fox tail swaying animation is looping seamlessly. The tail group animation repeats indefinitely.

Now we need to ensure that stars twinkling loops seamlessly. The star animate opacities repeats indefinite.

Now we need to ensure that shooting star animation loops seamlessly. The shooting star animateTransform repeats indefinite, with begin 2s and dur 4s. It will appear at 2s and then loop every 4 seconds.

Now we need to ensure that the first shooting star appears within 2 seconds. Yes, begin="2s". So first at 2 seconds.

Now check that the tail swaying animation is also seamless: it repeats indefinite.

Now verify that the fox tail swaying is visible. Yes.

Now ensure that the fox is clearly recognizable. It has ears, snout, tail.

Now check that there are many stars. Yes, we have many.

Now check that there is a hill (the near hill) and distant hills.

Now check that the moon has a soft glow. We used filter with blur to create glow.

Now ensure that the SVG is valid: no stray attributes like "xmlns". It's okay.

Now we should check that the code does not have any stray unescaped characters like quotes.

Now test a quick mental parse: there is no stray `<defs>` inside after earlier definitions. I see only one `<defs>` at top.

Now check the `<defs>` block: we have `<linearGradient id="skyGradient"...>`, `<radialGradient id="moonGradient"...>`, `<filter id="moonGlow"...>`. All correct.

Now check the `<rect>` for sky. Good.

Now check the stars: Many star elements. There's a star at `cx="800"` which is at right edge of viewBox, r=1. That's fine.

Now check that we have no stray `"` inside attribute values that cause syntax errors.

Now check for missing closing tags. The entire SVG should close with `</svg>`.

Now check the order: we have after the fox snout, we have `<circle>` for moon. Then `<g>` for shooting star. The shooting star group includes its animation. After that, the SVG closes.

Now the shooting star group includes its animation. That's fine.

Now there is no `<style>` or `<script>` used.

Thus the final code should be correct.

Now we need to output exactly one fenced code block with the SVG code.

Thus we will answer with:

```svg
... entire SVG ...
```